I’m so happy to have found an Advanced ScanNCut class being offered at Rocky Mountain Sew and Vac in Arvada, Colorado. There is nothing more frustrating than trying to get that darn machine to do what you want in the vacuum of your own limited experience. Even though there is a multitude of YouTube videos and online blog posts about how to use the ScanNCut, nothing substitutes for some hands-on use with a knowledgeable instructor and a classroom full of eager students sitting in front of their own machines.
I seem to have missed Class #1. Evidently they covered cutting for applique. I’ve had some success cutting fusible applique so I don’t feel I’m too far behind. You can read about it here. The instructor, Carol, did mention that she thought that cutting with the fabric side down and the fusible web side up (with or without the paper still attached) might work better. I’ll definitely investigate this and when this class comes ’round again, I’ll definitely take it.
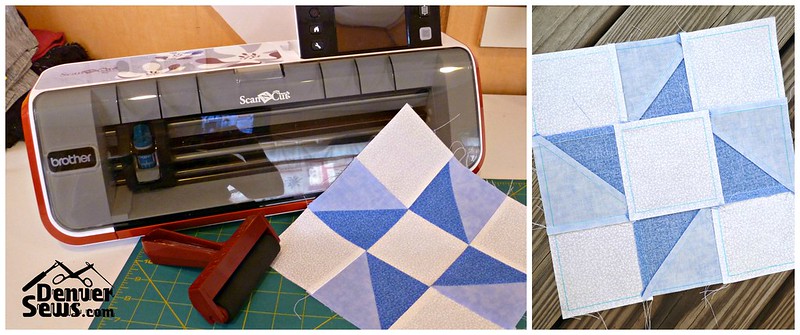
In Class #2, we focused on cutting fabric for quilting. We covered using the built-in quilt blocks on the ScanNCut and fussy-cutting using the scanning feature of the machine. None of these things are terribly difficult to tell the machine to do, but to get the cutting to work nicely is a whole different story!
Foundation
In this class, we were cutting fabrics without fusible webs as they were destined to be pieced together into quilt blocks. For this, we used the “high tack adhesive fabric support sheet” with the light blue backing. This sheet comes with the ScanNCut and provides an extra-sticky surface on which to place our fabric for cutting. The support sheet was applied to our least-used cutting mat, the low-tack mat. It will not be removed again until it has lost its effectiveness and it cannot be reused once it has been removed from the mat. These sheets are considered consumables.
The Importance of Starching
The quilting fabric needs to be prepared before cutting and it needs to be as crisp as possible so that the fabric cuts cleanly. This can be accomplished by starching the heck out of it.
Carol did us a huge service by testing out a few starches before class. She tried Terial Magic, Faultless Premium Starch (No Flaking on Dark Colors), and Mary Ellen’s Best Press Clear Starch Alternative. In her experience, Terial Magic worked the best. But on very dark fabrics, Terial Magic seemed to leave visible blotches and she used Faultless Premium Starch instead.
To starch our fabric, we sprayed the fabric with Terial Magic, ironed it (no steam) and repeated the process at least 2 more times.
Placement of Cuts and Good Adhesion
The ScanNCut comes with a little plastic spatula for smoothly adhering the fabric down onto the mat. This spatula is great for removing cut pieces from the mat, but it is a little inefficient for smoothing large swaths of fabric or paper. Many others have suggested using a brayer and I would heartily endorse this idea.
We also learned that cutting too close to the edge of the fabric or too close to the edge of another cut piece (unless that cut piece remains nicely adhered to the mat) is a bad idea. You want to reduce the opportunity for the fabric to detach itself from the mat while it is being cut. And you don’t want the fabric to become distorted while it is being cut. Hence the need for good starching and for good smoothing onto the mat.
The Importance of Good Quality Fabric
The most surprising tidbit of information I learned was the importance of using high quality fabrics. If I understand it correctly, lower quality fabrics tend to have lower thread counts and are thus lighter weight and more prone to fraying.
As an example, we cut a jack-o-lantern pattern out of three pieces of fabric. The orange and black fabric were of higher quality and cut cleanly. The green fabric was of a lower quality (as evidenced by the fraying) and it did not cut at all.
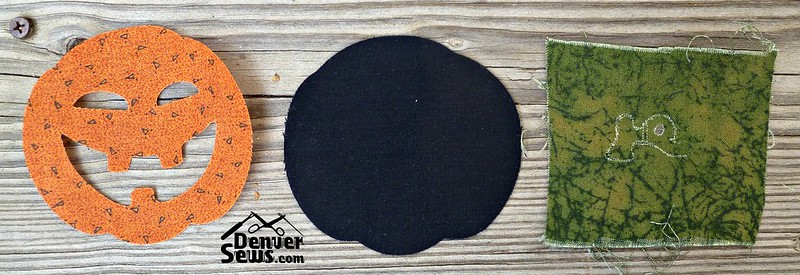
Settings: SPEED 5, PRESSURE 3, Standard Blade DEPTH 3.5
Praise for good instruction!
I was very impressed with how well-prepared our instructor, Carol, was. It was very clear that she did a lot of prep work and experimenting on her own before teaching this class. Thank you, Carol. I’m excited to take the next class.

Sounds like you have a great teacher. Love my ScanNCut but Brother has failed us in their reps training. My class was a joke, the teacher didn’t know anything and the next class was cancelled.
Thank you for sharing.
I have the most trouble with figuring out what depth, speed, pressure etc. to use.
LikeLike
thanks for sharing with us. There aren’t any classes in my area so I have been learning via the facebook groups talented ladies.
LikeLike
Lady, you are a jack of all trades. There isn’t anything creative that you can’t do! I love your ambition and drive. I’m not a quilter, but this machine sounds very interesting. 😉 have fun!
LikeLike
Reblogged this on lynnenew and commented:
All about starching, using the fabric support sheet, and cutting for quilting.
LikeLike
Thanks for the mini-class on ScanNCut! It was very informative! It makes me want a ScanNCut for doing applique – and it must be great for getting really accurate cuts for quilt piecing.
LikeLike
You’re welcome to try mine out if you’d like 🙂
LikeLike