
You may recall that I once tried cut out a rather intricate monogram of the letter K on the ScanNCut using marine vinyl (see here). It didn’t go so well because the marine vinyl just wouldn’t stay stuck to the cutting mat. I’ve decided to revisit that monogram to showcase how you can make some really intricate appliques with the help of a ScanNCut. Along the way, we’ll end up doing a little Dream Machine trouble-shooting.
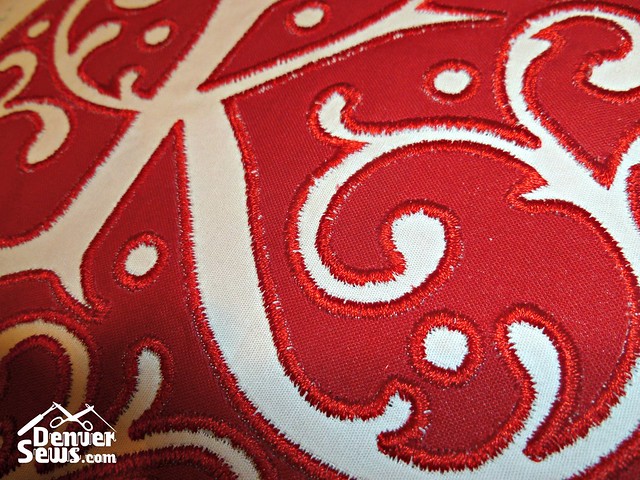
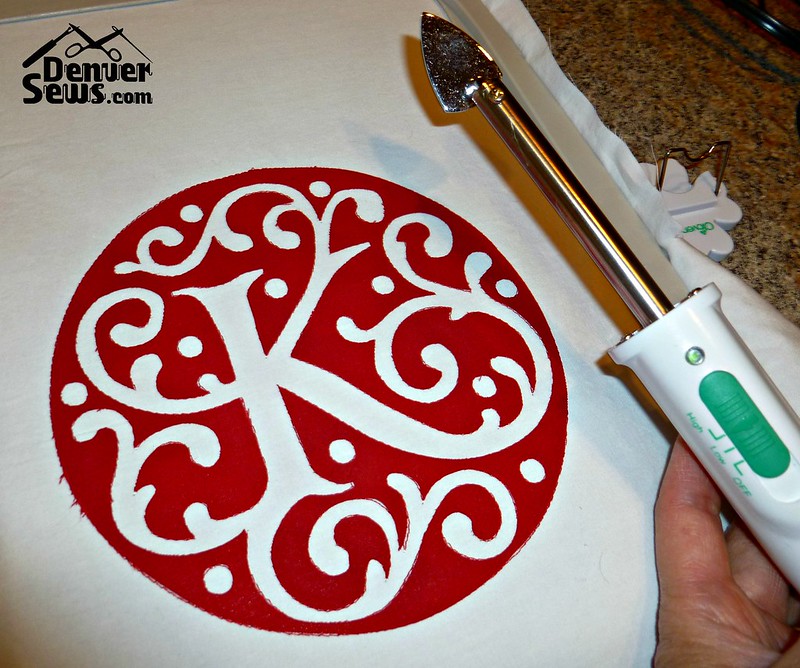
The monogram I used is shown here.

It is from CloseToMyHeart and appears to be an acrylic stamp. I think it is beautiful design and use it here for demonstration of a technique only.
Embrilliance Stitch Artist
I spent some time watching all of BriTonLeap’s YouTube videos about using Embrilliance Stitch Artist. If you’re looking to start digitizing with Stitch Artist, this is a decent place to start. I imported the JPG of the monogram using the “Image” button and resized the image until it was the approximate size I wanted. I then followed Brian (of BriTon Leap)’s suggestion and used the “Draw with Points” tool and “Edit with Splines”. I traced all of the edges of the design, including the exterior circle and the interior circles. For Stitch type, use “Artwork with no stitches” (the button with the rectangle in it).
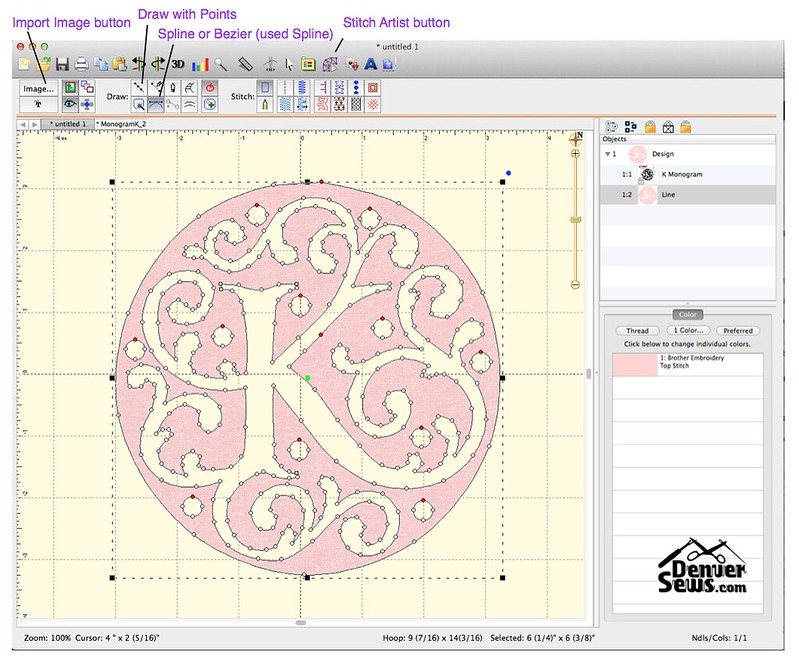
To combine all of these shapes into a single applique shape, you simply select all of the shapes you’ve drawn and use the Create menu item Outline->Combine Holes. Now surely you would agree that if we were to use a traditional applique technique, you would probably not want to hand trim all of these intricate edges. But with the help of Embrilliance and the ScanNCut, we can do it!
But first, we need to create the applique embroidery design in Stitch Artist. To do so, we first convert our lines to Applique by clicking on the Applique button (while our lines are selected).

Now if you select your applique design and click on the “Applique” button underneath the Objects window, you’ll see some interesting things. Each applique object consists of any combination of the following three steps (1) “position” or placement running stitch (2) “material” or fabric tack-down stitch and (3) the final top-stitch. (Remember that the “position” stitch is that first embroidered outline of your applique that shows you were to put your fabric. And “material” is the stitch that tacks-down the fabric.) The final top stitch can be an “E” stitch, blanket stitch, satin stitch, or nothing at all! In some cases you may want to hand-digitize your top-stitching to do something other than just follow the edge of the applique. That’s when you would use “none” for your top-stitch.
And also of interest is the Color Style option. If you have a multi-needle Baby Lock or Brother embroidery machine, you may want to use the “PES Card (Traditional)” option. Brother picked some specific colors to differentiate between applique steps and when those colors are used, the machine knows to stop before continuing on. I’ve never actually tried this on my multi-needle, but now I understand how it could be used.
And if you look under the “Color” tab, you’ll see that these colors are being used for each step that you intend to stitch.
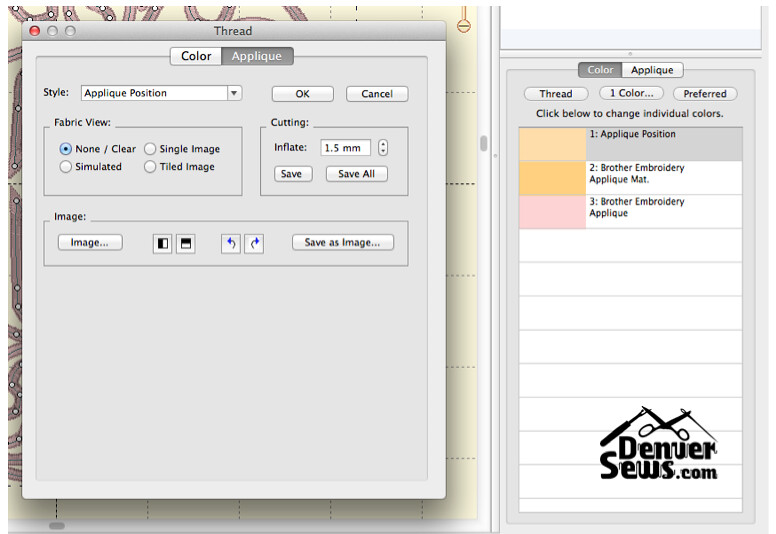
In the above example, I am stitching all 3 steps (1) Applique Position (2) Brother Embroidery Applique Mat. and (3) Brother Embroidery Applique. I think you can safely change the Brother Embroidery Applique color, but you want to keep the other two colors as is if you’re using the PES Card (Traditional) option.
But then check this out: if you select the Applique Position color in the Color list, the Thread window pops up. And if you click on the Applique tab, you may notice the “Cutting” options! Embrilliance will create a cut file using the applique position stitches as its guide. You can create a SVG, PLT, FCM or STUDIO file. For the ScanNCut, you need the FCM file. (BTW, this function may be part of Embrilliance Essentials and not Stitch Artist, I’m not dead positive). After picking an inflate value, you can click on “Save” to create the cut file in your choice of formats. It’s a good idea to inflate the size of your applique for cutting. I left it at 0.0 instead of the default of 1.5mm and paid the price later.
Now we can save the design in Stitch Artist. Copy the FCM file to a USB drive for the ScanNCut and the embroidery file to an appropriate medium for your embroidery machine.
Brother ScanNCut
For the ScanNCut, I prepped some lightweight cotton fabric with HeatNBond Lite, leaving the paper backing on. I used a brayer and applied the fabric, fabric-side-down onto the fabric support sheet which I had already applied to my Low-Tack mat. I used a blade depth of 3.5, speed of 3 and pressure 5 to cut the inverted applique shape.
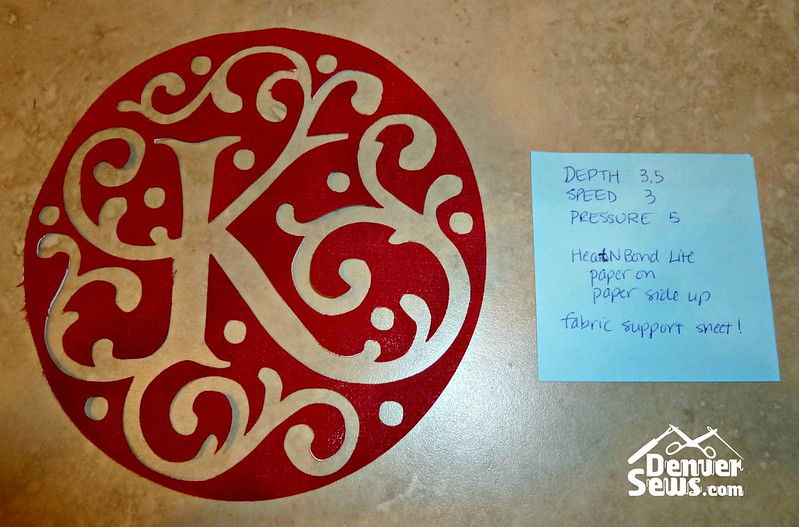
It’s not as clean as it could be because I used low thread-count fabric and I think I could have set the blade depth a little deeper. Besides that, it came out great!
Brother Dream Machine, Thread Messes, and Bobbin Cases
The final steps were to be made on the Dream Machine. I transferred the applique embroidery design to the DM and stitched the placement line.

I then used my handy Clover Mini Iron to bond the applique to the fabric, without removing it from the hoop, of course.
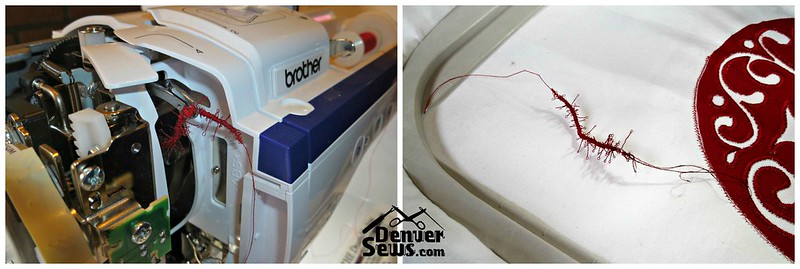
Returning the hoop to the machine, I proceeded to continue with the top satin stitching. Here I ran into two problems unrelated to this exercise.
First, I developed a healthy thread mess that I had to carefully remove. I’ve had this before on my Dream Machine and am wondering if this is peculiar to the Dream Machine. My older Brother ULT2001 single-needle *never* did this. Nor has my even older 6-needle. I’m hoping that by moving the thread into a vertical position, this problem will not happen again. It is interesting to note that if you look carefully at the thread mess, you can see that it gets “involved” in a part of the mechanism that it probably shouldn’t even be near. And the thread also gets a little greasy. If this happens again, I will look at the mess more carefully to see if I can figure out what is happening.
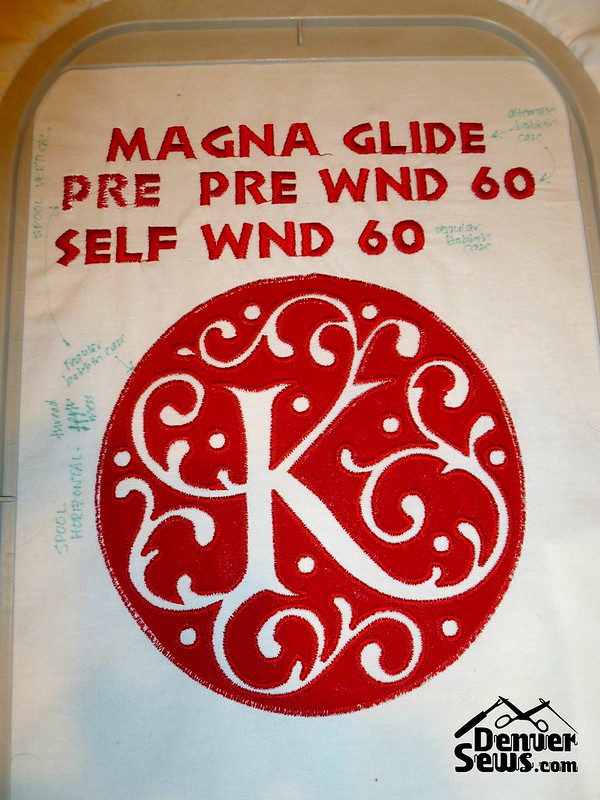
And also I noticed that my bobbin tension was definitely off and my bobbin thread was showing on the top. If you have a Dream Machine, you may noticed that it comes with two bobbin cases: the “regular” one and the “alternate” one. The “regular” one has a green screw on it and the “alternate” does not. And there are many possible sources of embroidery bobbin thread. I have the following three: I can wind my own with the provided bobbin thread (60 wt), use prewound bobbins in plastic bobbins (also 60 wt), or use some side-less magna glide prewound bobbins from my other machine. These side-less bobbins need to use the little bobbin booster or bobbin stand that is also provided with the DM. Clearly I did not know which bobbins went with which bobbin cases. Turns out all of my prewounds need to be in the “alternate” bobbin case and the self-wound bobbin needs to use the “regular” bobbin case. This is likely true for you, too.
Okay, so the bottom line is this – this applique worked! I should have made the cut file a little bigger and I should have used the correct bobbin case, but it did work.
So hallelujah! By adding a ScanNCut to your applique arsenal, you can make some pretty intricate designs. What would you like to try making?

hi! I am hoping that you get this as i see it is an old thread. i have been dying for some embroidery software, because it is sooooo! expensive i have been waiting years. I am looking at embrilliance stitch artist because of the vectore option. I think i may have already jumped if I could actually test stitch a design that i digitized…but demo mode will not allow it 😦
I am wondering how you feel about SA after a few years? have you moved on to other digitizers? some of the other similiarly priced ones do let you stitch, i.e. Hatch….and that packagaing is very shiny, i would have just done it but no svg import and that really changes the game because i do all my work in svg….i am just afraid i will regret spending way too much grocery money on software that i eventually figure out is inadequate….thank you!
LikeLike
Hi Lynne, I just read this post on the Applique and Scan & Cut. I have a Scan N Cut machine and a Janome embroidery 350E, plus Embrilliance Stitch Artist II. Stitch Artist II now has a way of bringing in the cut file first from the SCN fcm file. I did this and made my applique, but when I tried to get to the cutting options as mentioned on page 5 of this post, I could not see those options. Do you think this is because I already started with the fcm cut file and it does not need to be re-done? I am a bit confused here. Thanks for your help.
LikeLike
Wow! Yeah, can’t wait to get Stitch artist now! I already have a Cameo that I use for stencils so I might give applique a shot with it. Thanks for your great reviews and tutorials! 🙂
LikeLike
The applique is beautiful. I’ve had the thread mess only once so far. I picked out my desired design for the ScanCut machine, but until I get a job, I won’t be getting one. You do such lovely work on so many differentry machines! I just read about the software Embrilliance in my new Designs in machine embroidery magazine.
How about an S for me 😉!
LikeLike
I used to be a firm believer in doing things the old-fashioned way (except when it came to hand-stitching). So I avoided doing appliques because I didn’t want to do all that hand trimming and hand stitching. But now I see that by taking maximal use of technology, you can do things today that you wouldn’t have dreamed of doing maybe 6 months ago. It’s amazing.
LikeLike
How beautiful! I have neither the Dream Machine nor the ScanNCut :(. So, will have to do intricate appliques the old fashioned way. However, I adore the technology here; the sewing tech as evidenced here (and other areas) has gone through the roof!!
LikeLike
Certainly you don’t need the Dream Machine for what I did, but you do need the ScanNCut. I try to encourage people to buy the bottom-of-the-line ScanNCut because you don’t really need a pen for drawing and you don’t really need a bunch of built-in designs because you’re going to use your own anyway. Thanks for your support!
LikeLike
Wow! That’s gorgeous! But I’m overwhelmed by the complexity of making it. I’m still in love with your little embroidered daruma.
LikeLike
I love the “k” design. The scrollwork is so delicate and pretty. Thanks for the tutorial. Makes me wish I had one of those machines.
LikeLike