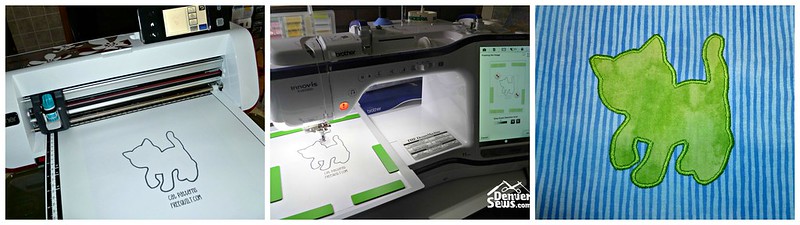
I’ve been meaning to do this little test for awhile. It’s simple: take a drawing of an applique shape and scan it on the ScanNCut for fabric cutting and scan it on the Dream Machine to create an applique embroidery file. Will the fabric piece and the embroidery design be the same size? If this experiment works, then I don’t need to use any additional software to create cut files and embroidery files for my applique.
So I started out with a cat outline from freequilt.com. I printed it out and scanned it on the ScanNCut to create a cut file that I saved on the machine.
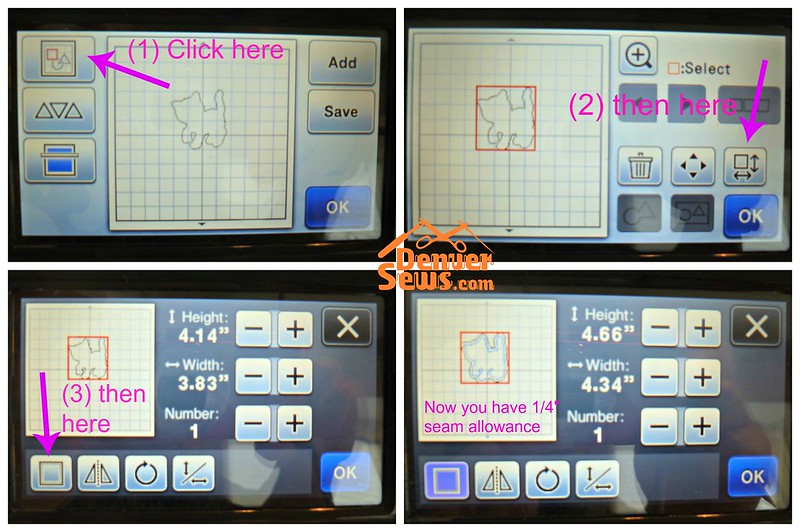
I’m using a fusible adhesive (HeatNBond Lite) for this test so I don’t need any extra seam allowance for turning. If I did need a 1/4″ seam allowance, it’s easy to add on the ScanNCut. Just follow the sequence shown below. You’ll end up with two lines: a draw line (the stitching or turning line) shown in blue and the cut line shown in black.
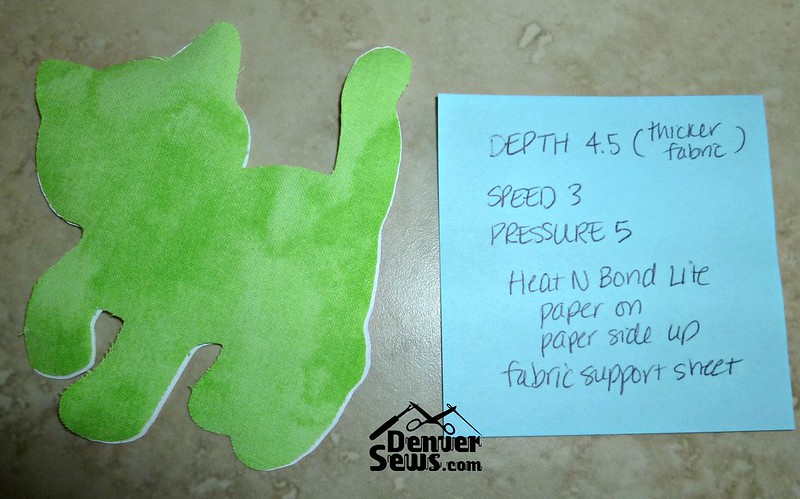
I don’t need a seam allowance, so I just used my original cut file. I applied HeatNBond Lite to my fabric, leaving the paper backing on. I put the fabric on my mat (with fabric support sheet) fabric-side-down. I mirrored my cut file on the machine and proceeded to do test cuts until I established the correct blade depth. Here is the final cut cat!
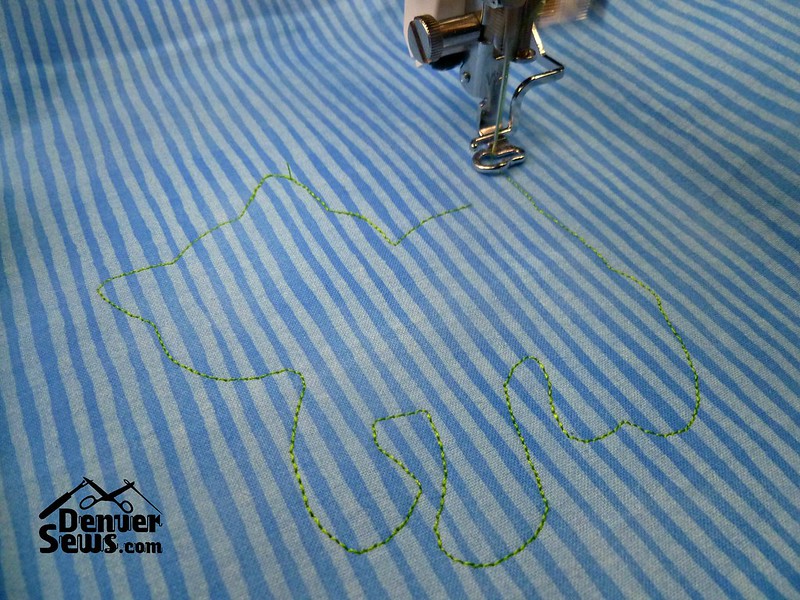
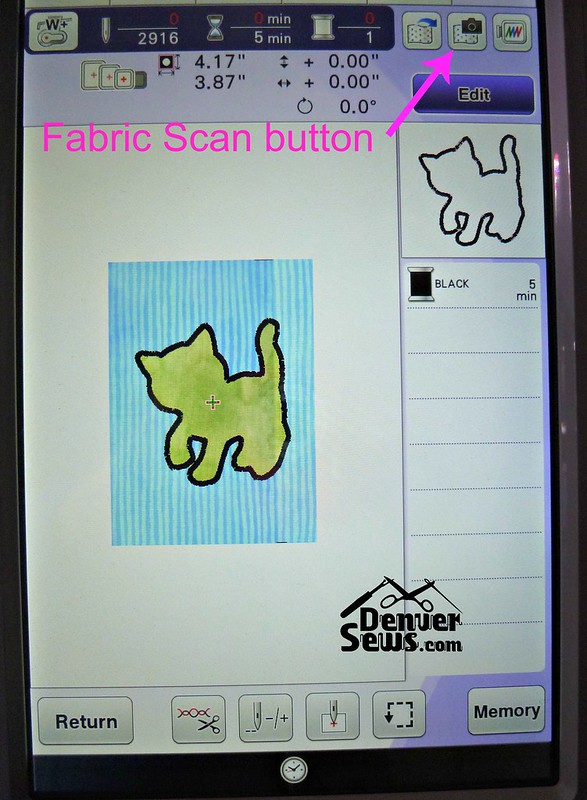
I took the same piece of paper and scanned it on my Dream Machine using My Design Center. I used the “Line” button and let the machine scan the image. The cat outline needed some cleaning up before I could “Preview” the embroidery design. I used the eraser button to clean up a few little ticks in the outline. I also saved the cleaned-up scan into the machine’s memory as I needed to create two embroidery files from the same scan: one for the placement stitch and one for the satin stitch.
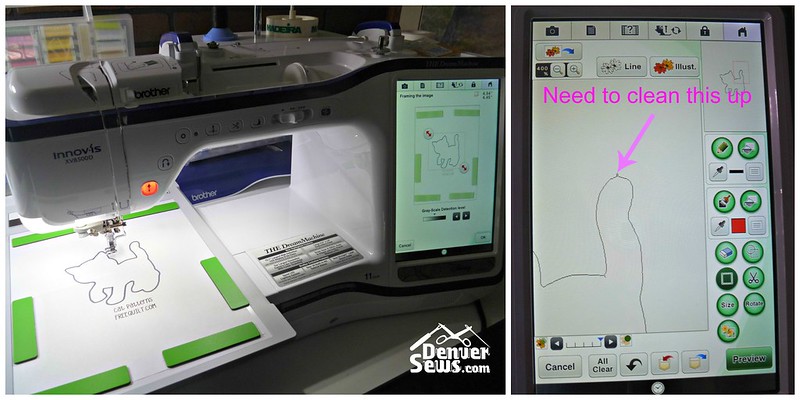
I used “Preview” twice from the same image scan. The first time I wanted a running stitch. The second time I wanted the widest zigzag stitch I could get which was 3mm. The machine created embroidery files which I saved in the machine’s memory.

First I loaded the placement line embroidery file saved in memory and stitched the placement line.
Then I matched up the cut fabric with the placement line. It matched! I fused the applique fabric to the background fabric. I then switched to the satin stitch embroidery file I had saved in memory. Using the fabric scan function of the Dream Machine, I scanned the hoop to make sure I had the satin stitch lined up exactly with the fused applique and then let the machine do its thing.
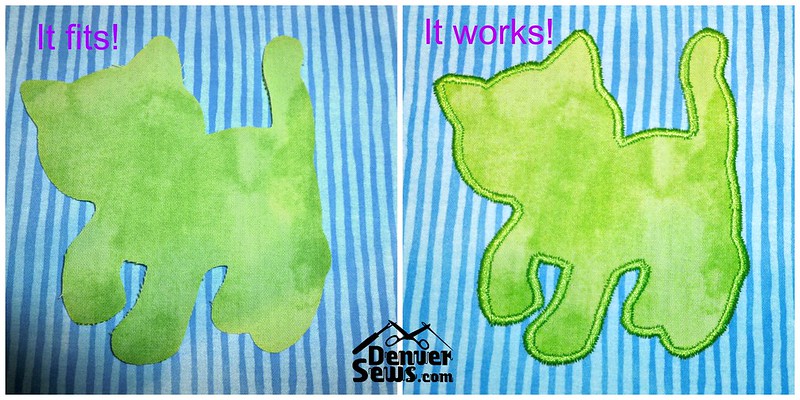
It all worked beautifully! I suppose I should have known this ahead of time. I figured that the ScanNCut was already precisely calibrated, but I wasn’t as sure of the Dream Machine. Turns out that its auto-generated embroidery file dimensions match up quite nicely with the dimensions on the scanned drawing.
So there you go! If all you have is a line drawing of a shape you’d like to turn into an applique embroidery design, you can use the same drawing with the ScanNCut and the Dream Machine to both cut your applique fabric and generate your applique embroidery files.

Instructions are perfect. I can’t wait to turn a frog my grandson drew for me into an appliqué and make Mom and Grandma a sweatshirt. I’ll let you know how it turns out. Thanks for sharing your experiment.
LikeLike
I am unable to us the print icon at the bottom of your post. Can you help?
LikeLike
I am unable to find a link or email address to contact Lynne. Is there a way? I am unable to print your instructions using the little print icon nor by clicking print on my computer. Help! Rita
LikeLike
Lynne,
Thanks for the helpful instructions. I picked up my DM a couple of weeks ago and I’m loving it. I’m hoping you can help me with a little problem I’m having. I tracked a flip-flop shape onto regular paper with a thicker tipped Sharpie marker. I did the line scan just fine and used the eraser to remove any bumps. I was able to create the placement file just fine, but when it sews it makes a lot of forward and backwards motions and sometimes sews a thicker (double or triple width) line. I was expected a single stitch that make one continuous path. Any help would be greatly appreciated.
Thanks, Larry
LikeLike
Sadly I don’t think I can help you much with this, Larry. That is the problem with an auto-digitizing function, you just don’t have that much control over what the software does. I’m wondering if some of the lines you scanned were thick enough for the software to interpret as multiple lines close together? Also I think that the software probably tries hard to sew continuously, but that means that the needle sometimes passes over things that its already sewn so that it can get to its next line to sew. Hope you’re having fun with your machine despite these issues! Lynne
LikeLike
Yes, yes, please please make some videos or do more tutorials for those of us who need more explicit instructions for using these two tools (Dream Machine and Scan and Cut). Your explanations are quite clear and the pictures you use are ever so much better than those in the manuals. Rita
LikeLike
I am in trouble now! I have the scan n cut. . . .. didn’t want the dream machine. . . until NOW!!!! I am in trouble!
LikeLiked by 1 person
Lynne, you are such a detailed person. Your instructions are wonderful. Why don’t you make some videos on YouTube? Your knowledge is versatile and so clear. I don’t own either piece of the equipment you describe, but I think if I did, it would be easy to follow your steps.
LikeLike
I saw the Dream Machine at our Sew-In for ASG this past weekend. Unbelievable…what a wonderful machine. So my question is, what do you do with it? Are you using it for more than just personal crafts/garments or are you going to use it professionally? It seems like a huge investment for just home use but it sure it a beautiful item.
LikeLike
Ha ha well that’s a good question. The Dream Machine has basically replaced my older Brother single-needle machine (which still worked flawlessly, btw). It’s such a big machine that I can’t get it into my sewing hut without booting my Pfaff Performance 5.0 which I do so love also. There’s definitely things I prefer doing on a single-needle vs a multi-needle and vice-versa. I think I temporarily lost my mind when I bought the DM, but I don’t regret it and intend to use it just for fun (primarily for embroidery) when I get more time ha ha ha!
LikeLike