
Well the highly anticipated Brother Dream Machine is finally here! I think many potential customers are intrigued by the possibility of creating their own embroidery designs on the machine. And I am certainly one of them. So let’s see what it can do.
My emphasis here is to explore creating designs using the machine’s scanning capabilities. I will explain how to create designs and we’ll see how well the machine does with some more intricate drawings.
Okay, this is going to be yet another ridiculously long post. So if you want an overview of where we’re going, here’s an outline:
- General Concepts: Lines and Regions
- Drawing Lines (pg 343)
- Painting Regions (pg 343-344)
- Undo Button and Clear All
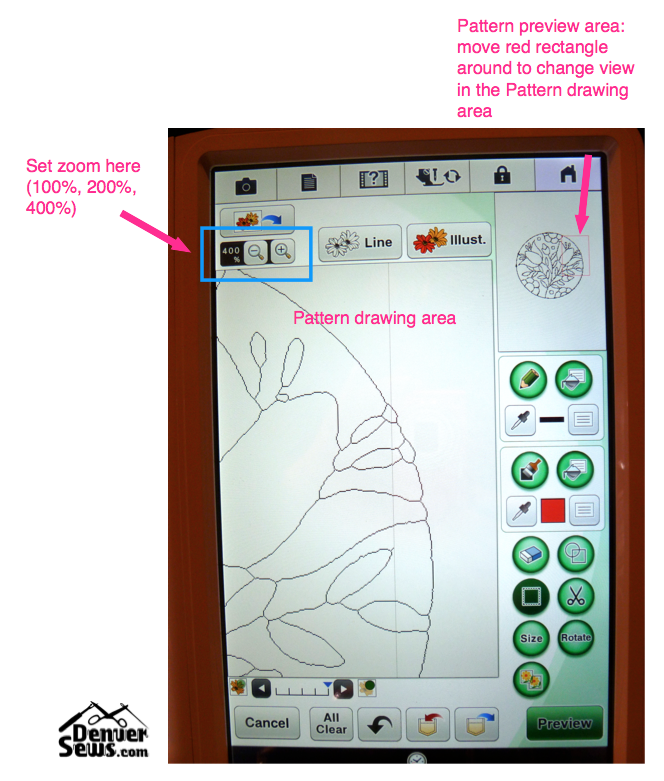
- Zooming and Panning
- Erasing and Cut Tool
- Stamps (for Lines and Regions, pg 344-345)
- [Optional Info] Interaction of Lines and Regions
- Scanning Image to Use in Background (pg 351-352)
- Line Scan (for Lines, pg 354-356)
- Line Scan Example
- Illustration Scan (for Lines and Regions, pg 357-359)
- Save Your Work!
- Conversion to Embroidery Design
- Settings (pg 347)
- Notes About the Final Embroidery Design
- Complexity
- A Few Last Thoughts: Pre-Wound Bobbins and the Color LED
- Conclusion
Page numbers refer to the Owner’s Manual, which can be found online here.
General Concepts: Lines and Regions
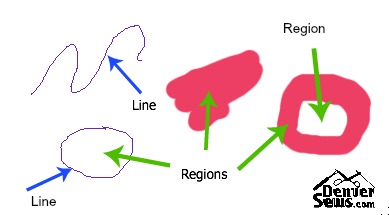
On the Dream Machine, embroidery designs are created from only two types of entities: lines and regions. A line will later be converted to a running stitch, a zig-zag stitch, or a triple-stitch in a color of your choosing. It can also not be stitched at all. If it is closed like a circle, it can be used to define a region.
A region is an area that will later be filled with “fill” stitches or a stipple stitch in a color of your choosing. A region also does not have to be filled with stitches at all. A “donut” shaped region will enclose yet another region.
So to create an embroidery design, you need lines and regions. You can create lines and regions by hand directly on the screen or you can use the “Line Scan” or “Illustration Scan” processes described later.
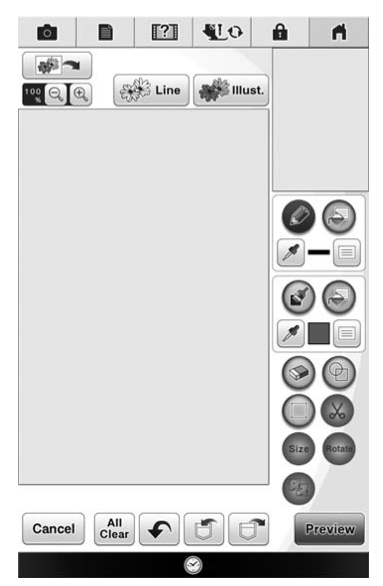
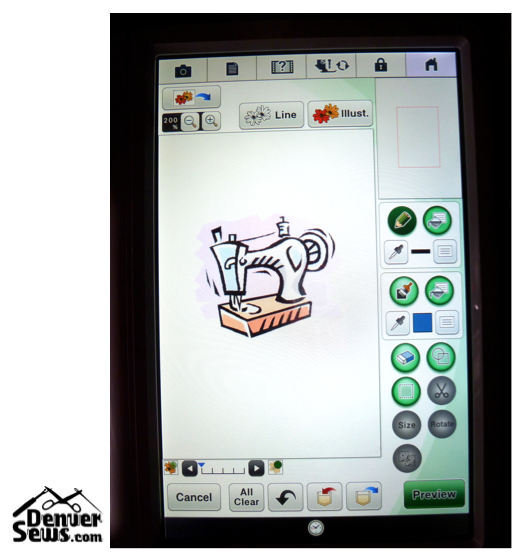
Let’s start from the beginning. So after selecting “My Design Center” either from the Home page or the Embroidery page, you will see this:
Drawing Lines (pg 343)
Lines are created with the Draw Line tool (looks like a pencil, straight line, or zig-zag). You can freehand draw a squiggly line, a single straight line, or a series of connected straight lines (pg 343). Sadly there is no curve or Bezier tool to help you draw nice smooth curves. Perhaps this is something to hope for in a future upgrade.
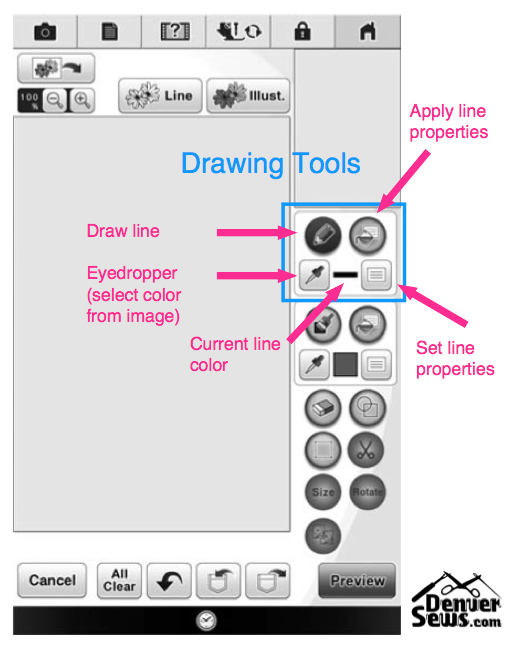
If you click on the Set Properties button, you can set the current line properties: the type of line to draw, whether or not to automatically close the line to create an enclosed region (for freehand drawing only), whether or not the line will be used for stitching, and the line’s color.
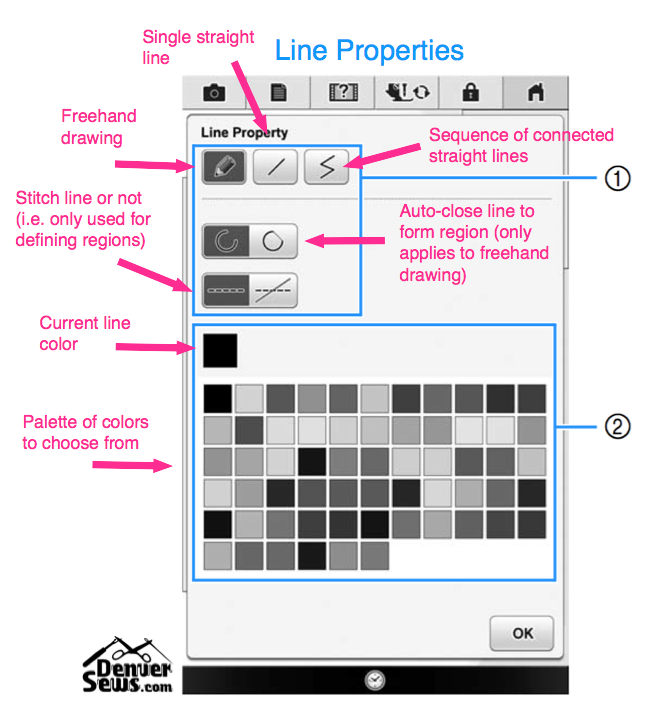
Of note, even if you switch your thread brand to something with more color choices (pg. 35), you will still be stuck with only the 64 Brother Embroidery colors to chose from in this menu.
To draw a line, click on the Pencil (or Line or Zig-zag) button and proceed to draw in the main drawing area. The current property settings will be applied to your freshly drawn line.
If you have already drawn a line on the screen and would like to apply new settings to it, you can use the Apply Properties tool to apply the current set of settings to an already existing line. Select the bucket tool and then tap on the line whose properties you wish to change. You may need to zoom in to do this. (Zooming and panning are described later).
Painting Regions (pg 343-344)
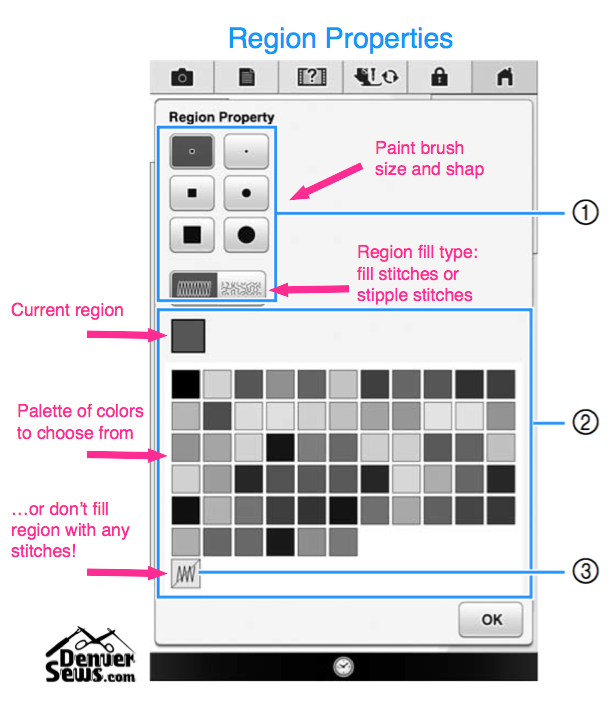
Regions are created with the Paint Region (brush) tool. Like the drawing tool, there are preferences you can set for the brush. Click on the Set Paint Properties button and you can set the shape and size of the brush tool. You can choose if a region will be filled with “fill” stitches, stipple stitches, or no stitches at all. And you can choose the region’s color.
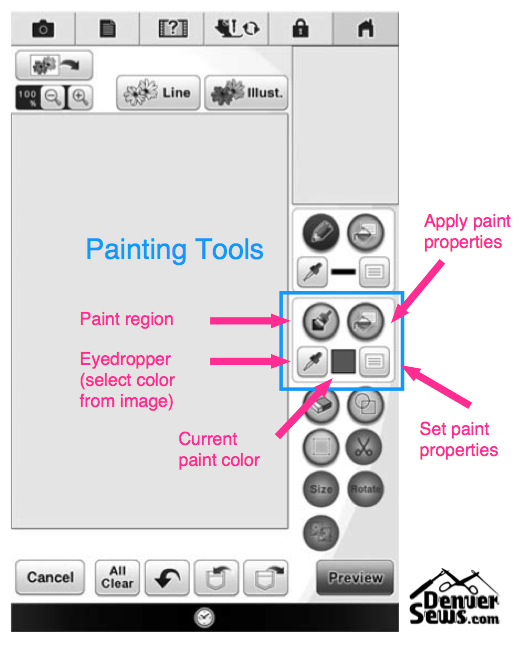
To paint a region, click on the Paint Region tool (brush) and then draw on the main screen. When you paint a contiguous area on the screen, you are creating a region (pg 344).
Don’t forget that a line that is closed creates a region within it. And a region with a hole in it also creates a new region.
Undo and Clear All
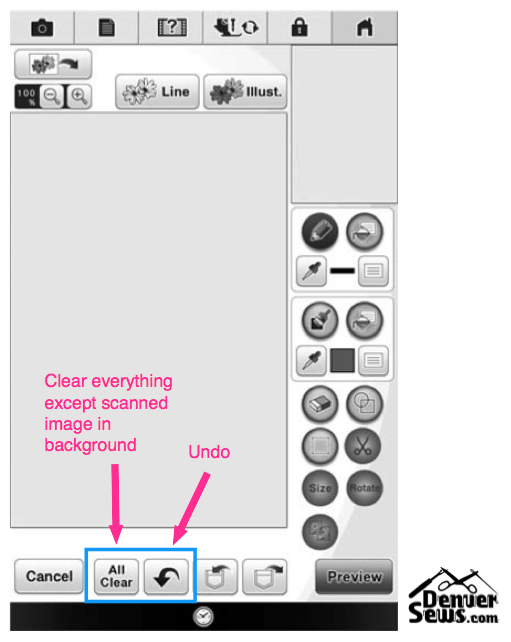
The Undo button is your friend! Sometimes you will fill a region with color and find that the color leaked out! Use the Undo button. But note that this can be a painfully slow operation. If you tap once on the Undo button, you will not necessarily hear the beep that acknowledges your tap. But if you wait long enough, the machine will eventually undo your last action. Hitting it again will undo the action before that. I’m not sure how many “Undos” are saved, but there are at least 2.
If you want to remove everything on the screen (except the background scanned image), then use the Clear All button. As far as I can tell, there is no way to clear the background image except by scanning a new image or possibly turning the machine off/on.
Zooming and Panning
Zooming and panning are also your friends. When filling in some small regions or trying to close small gaps in your lines with the Pencil tool, you will need to zoom in and pan. Once you zoom in, you’ll instinctively try to pan by dragging your stylus or finger around in the main drawing area like you might on a tablet computer. This will not work. You need to use the “overview” image in the upper right corner of the display and drag the red selection box around there. This will update what is shown in the main display.
Erasing and Cutting
There are many occasions that you may wish to erase an errant line or delete an entire section of your drawing. Use the Eraser tool or the Selection tool (rectangular selection) with the Cut tool to clear areas of your drawing.
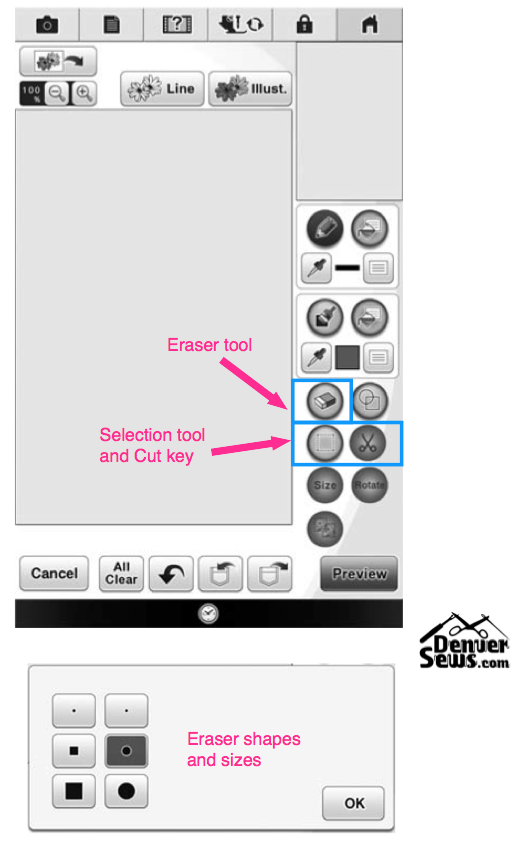
Note that every time you choose the Eraser tool, you will be asked to choose the Eraser size/shape. If this becomes annoying, you might want to plan on doing all your erasing at once. Also, it is not always evident where the LCD will think that you’ve touched on the screen with your stylus. I found it helpful to start erasing on the screen a little away from the area I want to fix, moving slowly towards it until the pixels I needed to erase truly disappeared. And sadly, drawing on the screen with the stylus can be very awkward because you cannot lay your palm against the display.
Stamps (for Lines and Regions, pg 344-345)
The Stamp tool (pg 344-345) gives you pre-formed shapes that can be used to define both lines and/or regions.
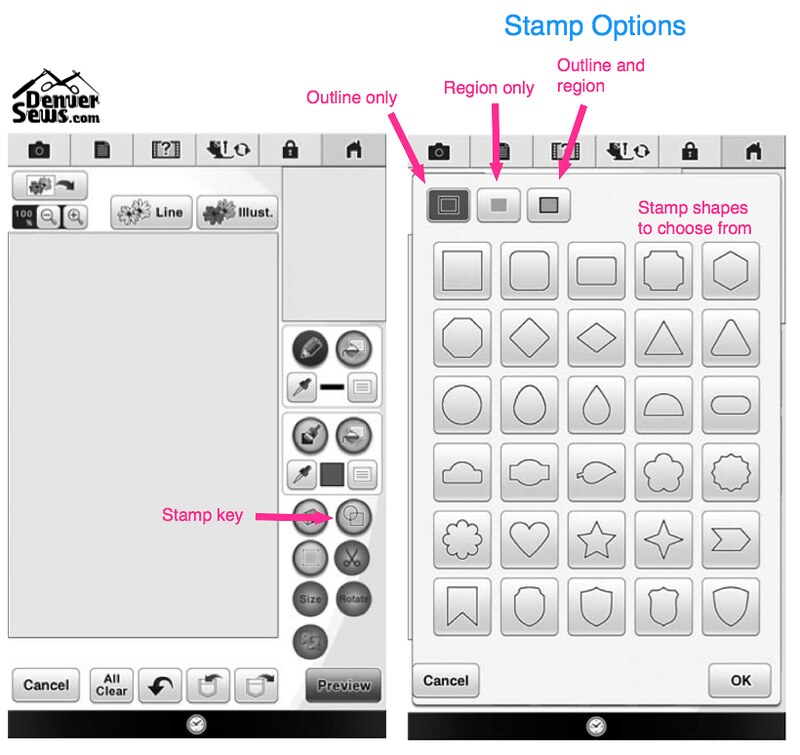
Click on the Stamp tool and choose a stamp shape. You can also set whether the shape will be used as an outline only, region only, or both. Click on the OK button.
If you want to change the shape or rotation of the shape, you need to click on the Size or Rotate button.
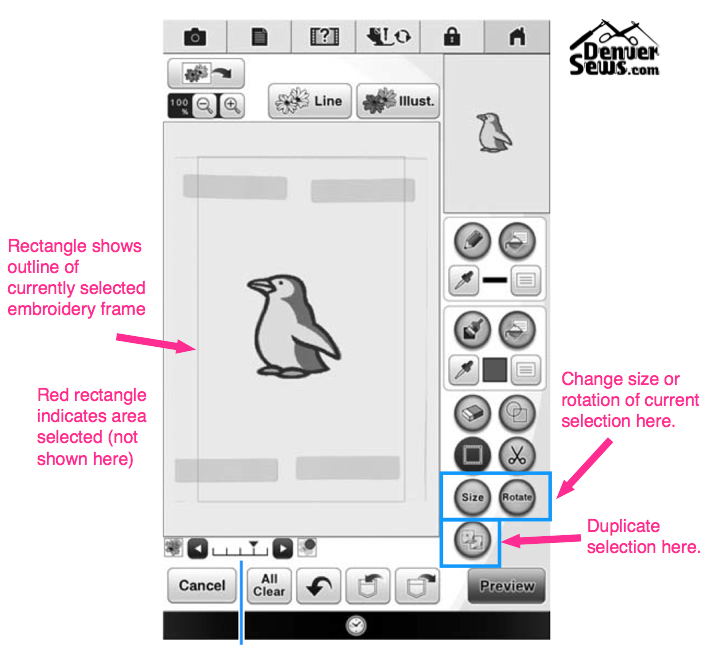
I apologize for the above image showing a penguin instead of a stamp shape. But consider this: when you choose a stamp shape, it will appear in the Main drawing area and it will be selected (surrounded by a red rectangle). This will be your ONLY opportunity to change its shape and rotation by itself. Once you unselect the stamp (by tapping on the screen), you will not be able to select the stamp again by itself (unless it can be isolated in the drawing area). The shape becomes just another line or region in your drawing.
If you select the Size tool, you will be given options for scaling the shape or stretching it. Unfortunately, there are no measurements given, so you do not know exactly what size your shape is. The only reference is the embroidery frame that is drawn as a rectangle in the drawing area. If you want to change the drawn embroidery frame to a different size, you need to change it in the Machine Settings. See pg 35, Embroidery Frame Display.
[Optional Info] Interaction of Lines and Regions
I posed this question: what if you had a line that overlapped with or touched a region of the same color. If you changed the color of the region, does it change the color of the line as well? The answer is no. The Dream Machine somehow keeps track of the difference between a line and a region, regardless of color.
I also posed this question: what if you drew a line and then intersected the line with a region thereby splitting the line in two. If I then changed the color of one end of the line, does the other end also change color? The answer is no. They are now two separate lines.
And here is another question: if you have two lines that intersect and you change the color of one line, does the other line change color as well? The answer is yes! Any lines that touch each other are affected as a group when applying new line properties.
Scanning Image to Use in Background (pg 351-352)
So if you wanted to, you could create an embroidery design just from hand-drawn lines and hand-painted regions and stamps using the tools described above.
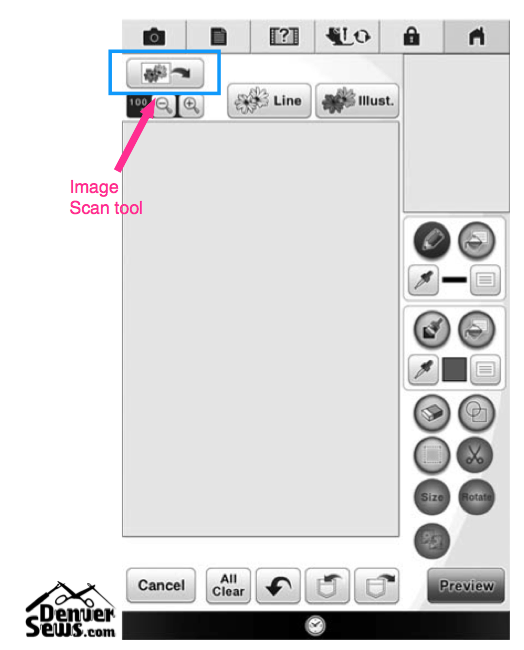
It is sometimes helpful to have a background image that you are trying to outline or mimic. If you’d like to do this, place your image on the scanning platter and press the Image Scan button to scan the image. If your image is on a USB flash drive or your computer, this is how you would retrieve that image as well.
Once the image has been scanned, you can adjust how bright it appears with the Transparency adjustment bar (pg 352).
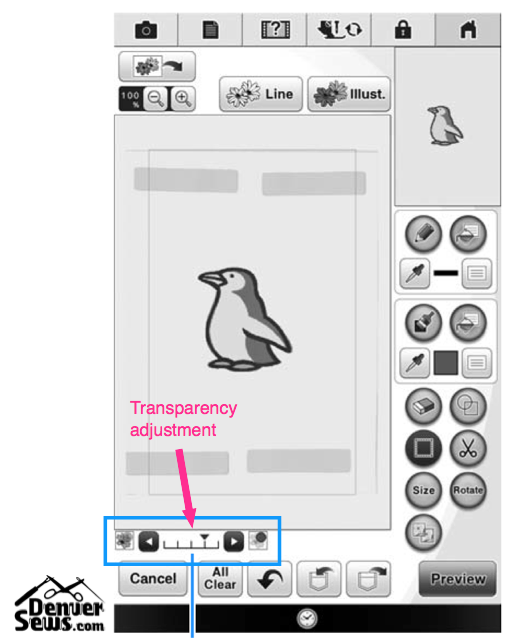
Moving the setting to the right makes the background image more dim.
Proceed to draw lines and paint regions as before.
Line Scan (for Lines, pg 354-356)
Finally, we’ve gotten to scan processing! So here is another way of adding lines to a design besides drawing them by hand.
The idea here is that you’re asking the machine to scan an image consisting of only lines and the machine will auto-detect just the lines that it sees.
You will have the best success if the image is high-contrast, crisp, and the lines are 1mm wide and uniform in thickness. If your lines are wider than 1mm, you should probably try the Illustration Scan process described later.
To use the Line Scan process, you need to first scan the image. You can do this by first pressing the Image Scan key and then pressing the Line Scan key. Or, if there are no images already scanned into the background of your main window, you can press the Line Scan key directly.

The machine will proceed to scan the image. This is accomplished in 4 passes. I find it best to unthread the machine and turn off all of my room lights. If you still have ambient room light or light coming in from a window, be sure that the scanning platter is at least as evenly lit as you can get it.
After the image is scanned, you are asked to select the area of the scanned image to actually process and to set the gray scale detection level to differentiate between background colors and line colors. You can use the middle setting for now and come back to this step later if needed (pg 355).
After the image is processed, look at it closely to see if there are any obvious holes in lines you thought should be connected. If there are, go back and try setting the detection level to a lower level (move the indicator to the left).
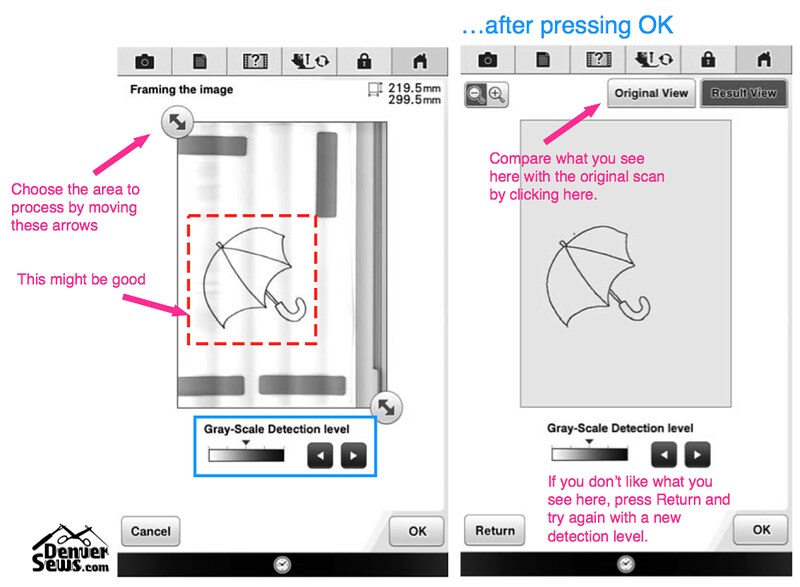
Once you are satisfied, continue by clicking on OK. If there are holes that you just can’t get rid of, you can fix these later by hand.
Once you have processed a scanned image into lines, you can then change the properties of the lines (such as color or whether or not you want it stitched) as described in Drawing Lines above.
If the lines create closed shapes, you can change the properties of the enclosed regions (such as color, fill or stipple or no fill) as described in Painting Regions above.
If you find that a line did not close as you expected, you can use the pencil drawing tool and close it.
Line Scan Example
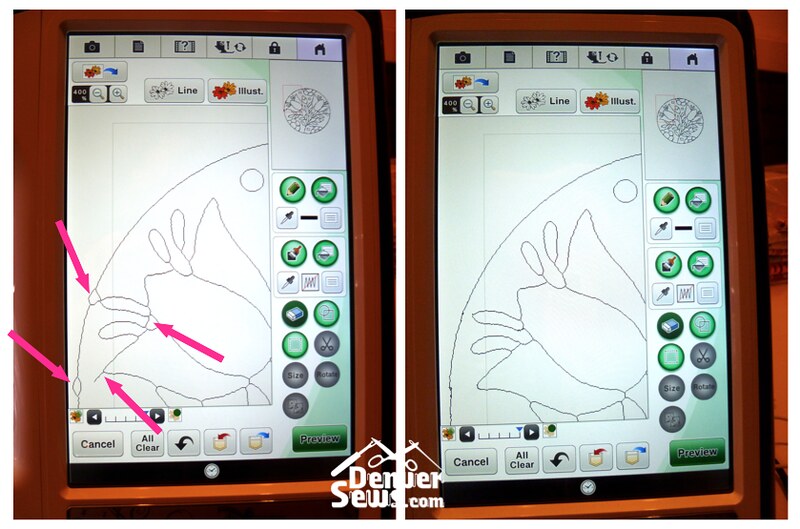
I found this beautiful stained glass design online from Google Images (“stained glass flower design”). Sadly, the website from which it originally came seems to no longer be in existence: entertainmentartandfashion.blogspot.com. I enlarged the design and printed it. The lines are probably closer to 2mm thick and are not ideal for Line Scan. However, I used Line Scan to process the design. The results are shown below using different grey-scale detection levels.
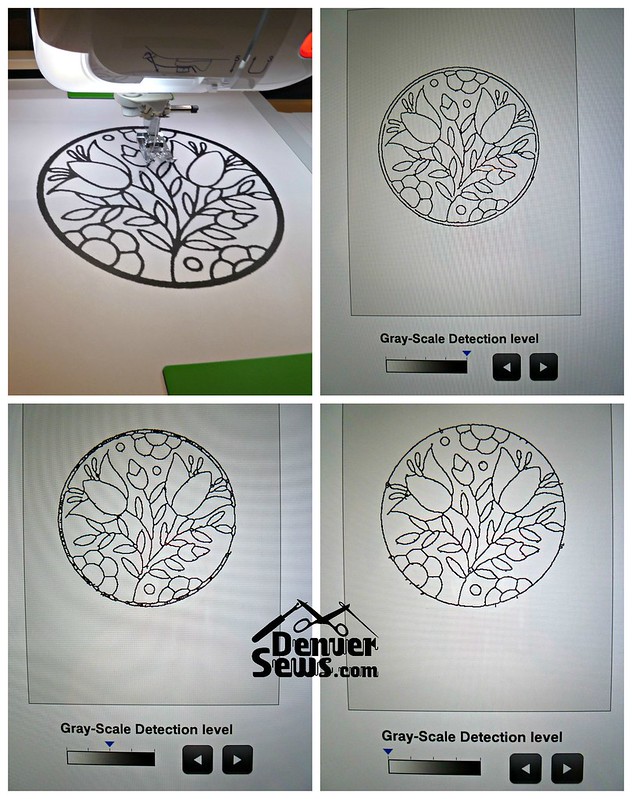
Note that the lines are thick enough that the machine interpreted some lines as double-lines. In this case, it may have been better to use the Illustration Scan to look for wider lines (described later). Here is the best result I was able to achieve with Illustration Scan:

But continuing in the Line Scan vein, the most optimal Line Scan result is the last one (with the lowest grey-scale detection setting). If you look closely, there are small bubbles along the edges and a few tails. All of these things should get cleaned up before you begin to color the regions. Zoom in and examine your design closely. (You might want to make the background image disappear by sliding the Transparency adjustment to the far right.) Use the Eraser tool to remove extraneous lines. Use the Pencil tool to draw in missing lines, especially if you need to close regions.
Once lines are cleaned up, you can proceed to paint regions and create an embroidery design.
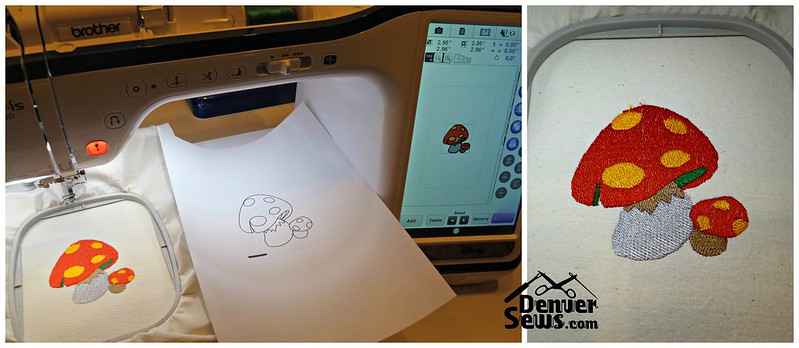
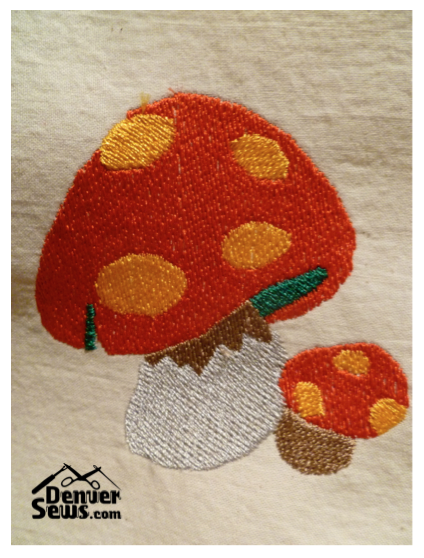
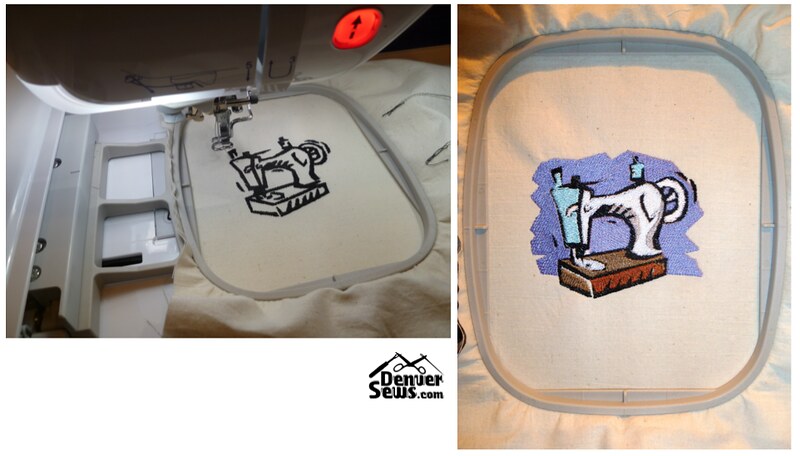
The mushroom design shown at the top of this post is an example of an image that scanned and was processed to lines flawlessly. I used the mid-grey setting for line detection and no further clean-up was required. The mushroom drawing was found at printablecolouringpages.co.uk. It’s a Smurf(tm) mushroom! Note that I chose not to embroider the final black outlines as I felt it looked fabulous without them.
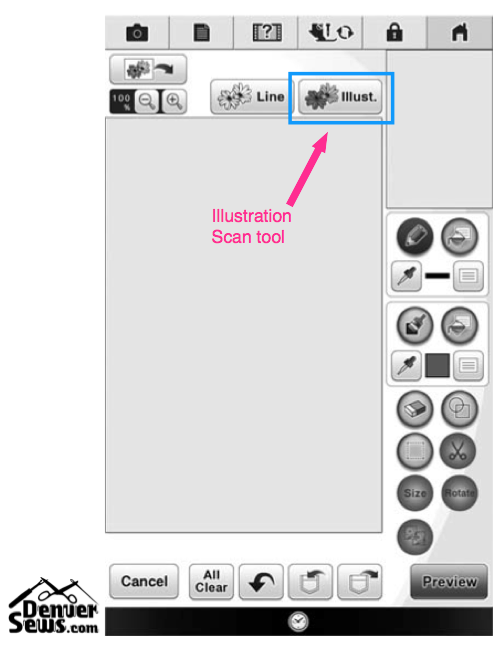
Illustration Scan (for Lines and Regions, pg 357-359)
So the idea here is that you’re asking the machine to scan an image and auto-detect primarily the regions that it sees. You can have it also try and auto-detect lines. If you are looking for lines, you need to set the line-width it is looking for and the color (pg 358).
So the types of images that work best here are those with solid blocks of color, crisp edges, and easy-to-differentiate colors. If you have a B/W design where the line widths vary and you want to preserve the varying line widths, then you’re better off treating these “lines” as regions and sticking with the Illustration Scan. If you have a line drawing with thicker lines, you might use Illustration Scan to detect these wider lines.
Scan the image by pressing the “Illustration Scan” button. Or, if you already have an image in the background, press the “Background Scan” button first and then the “Illustration Scan” button after the scan has occurred.
After the image has been scanned, you then need to tell the machine the maximum number of colors you expect it to find and whether or not to look for lines of a particular color and width. I have found that the machine does a terrible job of converting scanned colors to embroidery colors. But as long as the machine can differentiate between colors, you can always paint them with the right colors later. If you don’t want the background image color turned into a sewn region, be sure to select “Remove Background”.
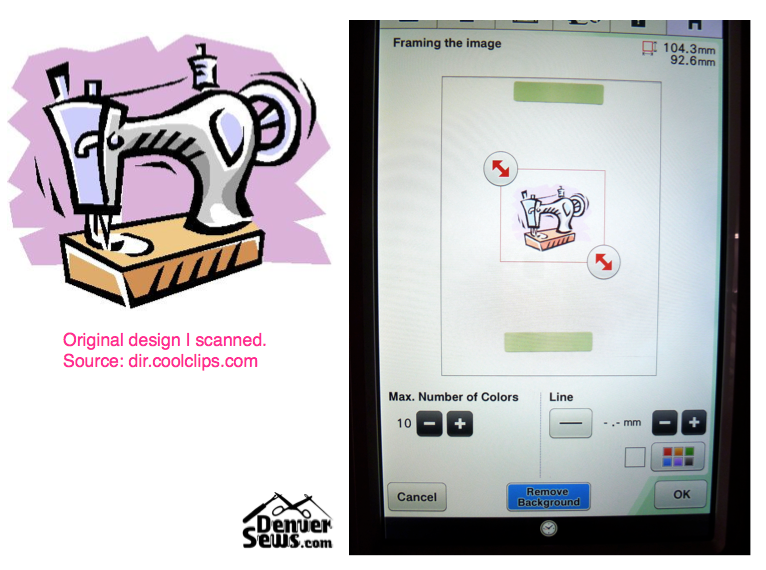
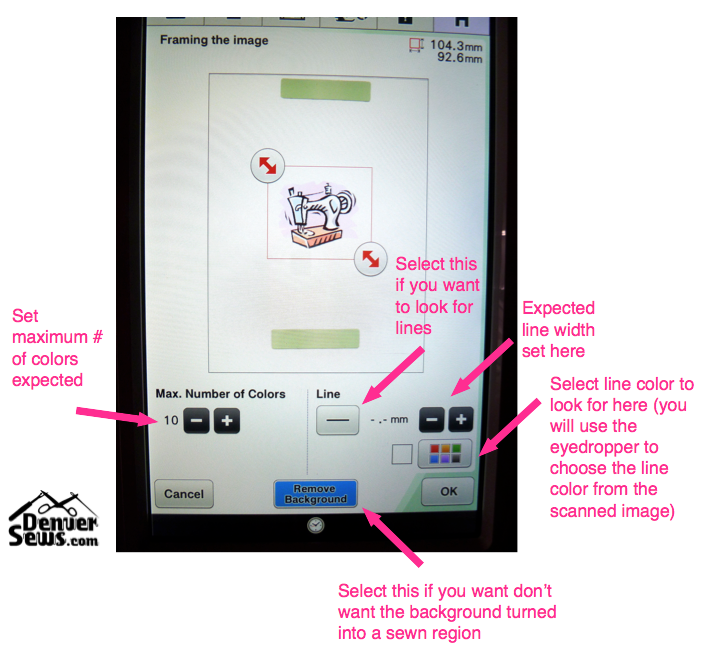
Note that the image used above was found here from dir.coolclips.com.
Once your scanned image has been processed, you can modify the region properties (such as color and fill pattern or no fill at all) and you can modify the line properties if you have lines.
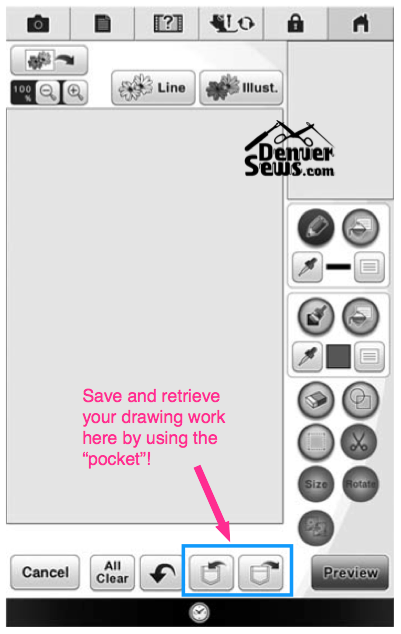
Save Your Work!
If you want to save your drawing for use later, put it in the “pocket”!
Conversion to Embroidery Design (Preview)
When your drawing is complete and you’re ready to convert it an Embroidery design, choose the “Preview” button.

Settings (pg 347)
Before your drawing is converted to an embroidery design, you must set the stitch settings. I would recommend the following:
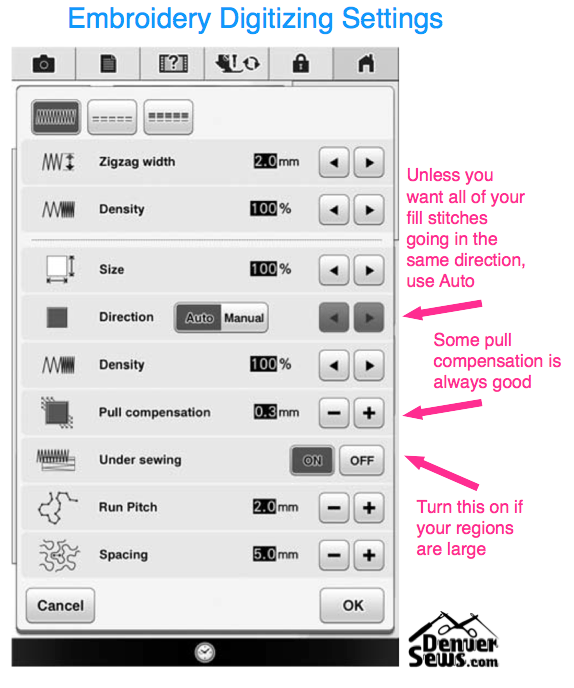
The last two options pertain to stipple fill stitching. Click on OK to create your embroidery design!
EDIT: I failed to mention that the top row of buttons control what kind of stitching your lines will be turned in to. From left-to-right: zig-zag stitch, running stitch, and triple-stitch.
Notes about the Final Embroidery Design
It seems that in the final embroidery design, the lines are sewn last. I noted that with the mushroom design, the embroidered product looked so good without its black cartoon lines, I didn’t bother to sew them and I think it looks great:
As for the sewing machine design, I noticed that there were some very small regions that had been auto-generated during the Illustration Scan that I didn’t know about until *after* I had converted the drawing to an embroidery design.

Also, the black regions were sewn first and were partially covered up by all of the other colors. If I had to do it again, I *might* consider sewing the black regions last. But the results are very nice nonetheless!
Complexity
I did try using Line Scan on a more detailed line drawing of an owl. This spectacular drawing was found at pepperstorm.blogspot.com.
After using Line Scan and coloring in all of the filled region (and fixing some holes), I was not able to turn my drawing into an embroidery design.
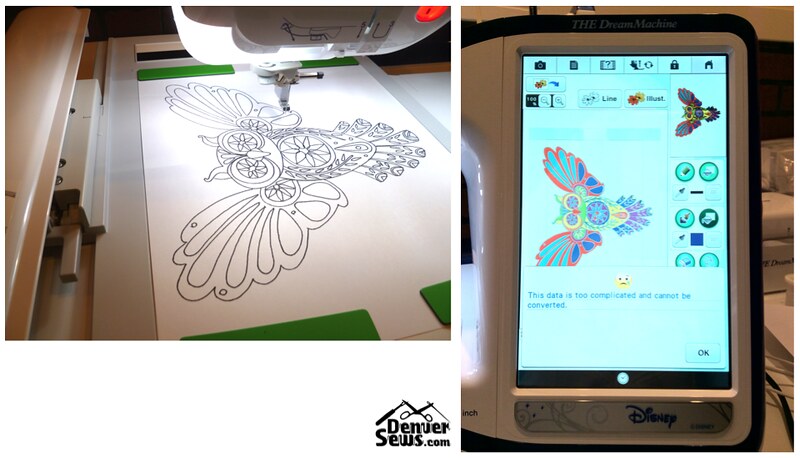
EDIT: In case you can’t read it, the message says “This data is too complicated and cannot be converted :(“.
If I were to try again, I would clean up and simplify the output of the Line Scan before coloring in the filled region. Perhaps with fewer lines and regions to digitize, the software would have succeeded.
A Few Last Thoughts: Prewound Bobbins and the Color LED
I was delighted to discover that my Fil-Tec Magna-Glide prewound bobbins (size L) work beautifully in this machine! They are not as tall as the standard SA156 bobbin, but if you use the Bobbin Center Pin Spacer provided with the machine, they work just fine.
And finally, the Color LED system is kind of fun to use (pg 276). It doesn’t exactly match the color thread you’re set to use next, but it does give you a rough idea. Often, I don’t follow the suggested colors anyway, but if you happen to rely on color cueing, you might find it helpful.
Conclusion
I am pleasantly surprised by how well this machine converts drawings to embroidery designs. Start with clean line drawings and nice blocky colored images. Clean them up after Line Scan or Illustration Scan and before coloring them in. Try to keep complexity to a minimum. Using this approach, you should be able to convert your favorite clip art or line drawings to unique embroidery designs without too much trouble! The possibilities are endless and I declare My Design Center a huge success!

I just found your blog — how wonderful !! Yes, your instructions are VERY clear and easy to understand — I really have a hard time following the manual !!
LikeLike
Page s9 in my settings is frayed out now after I deleted the last image I cannot figure out why can you help? Thanks
LikeLike
I too…..would love to own a Dream Machine but ……I cannot find enough info on video sites to show me what all the machine can do. I would love to read the instruction book on the machine and not buy it until I do. I did however find a wonderful video on the Pfaff machine and it lasted close to 1 hour. Their are 2 videos on the Pfaff machine, one is for the sewing part of it and one is for the embroidery part of the machine. Both of the videos are so complete and I have certainly learned a lot from them. The machine does not have the scanning benefit I was so loving the thought of scanning a picture and then embroidering it. I am not so sure now if I need the feature. I have enjoyed all that the Pfaff can do and the quality of the machine. I am not sure now just what I will end up buying. Still looking
Betty Oswalt
LikeLike
Your tutorial is very good , Thank you for this tutorial so much
I started off with embroidery 🙂
LikeLike
This is a great tutorial for the scan feature. My only complaint would be that it’s not on YouTube for people like me that need visual aides. There just isn’t enough YouTube tutorials on the functions of this great machine
LikeLike
Great tutorial, great Dream Machine community; I’m moving to Denver.
LikeLike
Give us s visit when you do!
LikeLike
I have been reading your tutorials on the I got one for Christmas I would like to print out your tutorial but for some reason I can not get it to print. This tutorial is the best on the web or you tube, would you please tell me how to print this out so I can use it at the machine. After reading your tutorial I no longer think that I have too much machine for this small brian.
Thank you any help you can give me on printing this out will be great!
Edna Romeo
LikeLike
Your blog is wonderful and so easy to follow.
LikeLike
Hi Lynn, Thank you for this tutorial. I learned so much from it and have save it for future reference. I got my Dream Machine about a month ago. It is a wonderful machine and I want to learn as much as I can about it. It can do so much and I agree the manual could use some help. I hope you will do more tutorials. Thanks again!
LikeLike
I totally agree with the comments about the Brother Manual. This is a wonderful review which i have saved for when I’m ready to try the scan features out. Thank you so much.
LikeLiked by 1 person
Loved your blog on the Dream, I have had mine about a month and still not comfortable, your blog helped and no you did not mention how to set lines, and for those of us who are not computer literate it might take some practice or another tiny add on blog. Thanks for doing this. I suggest you contact Brother also, your better than their manual!
LikeLiked by 1 person
My computer is printing this out as I write my comment. You should contact Brother, include this set of instructions, and offer to write a real user’s manual for the Dream Machine. If you ever tire of being a computer programmer, you have a brilliant future as a technical writer. Among other things, your instructions are visually clear with good spacing, which is often not true of the manual. It’s odd that after putting so many glorious features and qualities into the Dream Machine, Brother went the cheap route with the manual–all grey and black and white, no color, and dense pages, not to mention information that ought to be together being scattered around. Brother really should contract with you to prepare a first-rate manual. I’d buy it in a heartbeat.
LikeLike
Why thank you! I did forget to mention how to set the “lines” to running stitches or triple-stitches instead of a zig-zag, but hopefully people can figure it out on their own. Let me know if my instructions are actually helpful.
LikeLike
This is great info for me as I live in country Australia how do I print this out I try to learn all I can but struggle sometimes
LikeLike