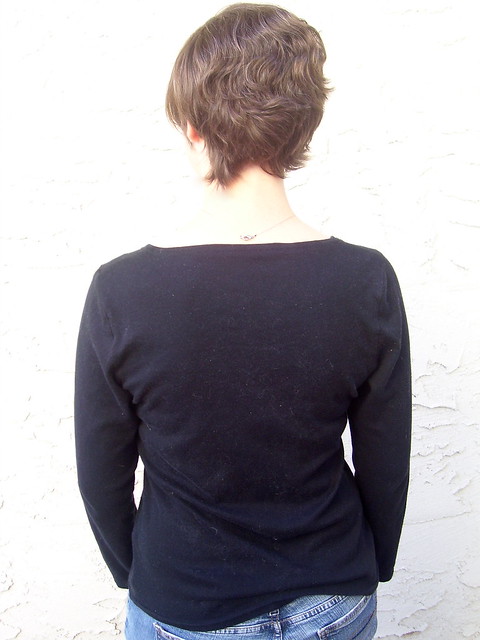
My first foray into building my core wardrobe is a long sleeve tee using the SBCC Tonic 2 Tee pattern.
I can only think of two items that I’ve done using a knit and one of those was a complete nightmare. This time I’m going in ready for success powered by sewing blogs.
Melly Sews suggests using the lightning aka wobble aka stretch stitch on knits so the seams can maintain the fabrics stretchable quality. Lladybird uses a walking foot so both layers of your knit feed through evenly. The Tiramisu Circus has a nice post on stabilizers for knits.
First off let’s talk about the pattern. It was free so that’s great. Instructions are super easy, though I modified the neckline procedure. The instructions have you apply the neckline trim while one shoulder seam is still open, then tacking down the trim after the shoulder seam is closed. That seamed sloppier than I want, so I did it the old-fashioned way of inserting the circle of trim into the closed neckline. Even if you follow her instructions your left to guess how much to stretch your trim so it will lay flat instead of gaping. A little guidance there would be nice. I had a little gaping that I had to press the heck out of, but it practically disappeared after washing. I like that the pattern calls for self fabric for the neckline trim.
My first seams, the shoulder seams, incorporated all three of my knit fabric firsts; walking foot, stay tape, and lightning stitch. Other than the fabric getting munched on the first couple stitches almost every time, things were working to plan. When I attached the neckline trim though, I found that the stitch length was so short that it was going to take forever to get this sewn. I did a few tests to try to figure out the problem and didn’t have my aha moment until I was half way through attaching the first sleeve.
My solution? Sulky Solvy original water soluble stabilizer that I bought forever ago thinking I’d make one of those lacy thread scarves. So glad I didn’t cause I stopped thinking those were cool after five minutes. I started laying down strips of this stuff on top of my fabric and it helped my walking foot get enough grab on the top layer to move things through and give me the stitch length I was expecting. Wrapping a bit of this stuff around the beginning of my seams also helped with the afore-mentioned munching.
So here’s the results.
I chose to make a medium since I was between sizes and I’m sick of tees that are too tight under the arms. Next time I’d definitely go with the small as I have plenty of room here. I took off 1.5in from the bottom before hemming and this tee is still on the longer side. Overall I’m not displeased with the tee but not terribly excited either. I’m holding judgement until I make this again in a smaller size and can make a couple of adjustments. I think I’d like a smaller neck opening and I’d like to figure out how to pinch out those folds between bust and underarms.
This project took a surprising 3.75 hours. Using the walking foot and fiddling with the stabilizer is just slow going, but worth it to get those seams to play nice.
So I’m wondering if its worth all the time and effort to make something so basic. Would it be better to keep looking for RTW tees that fit? But that would mean clothes shopping.
Check out more of my sewing attemps at mahlicadesigns.wordpress.com


I think the fit on this looks great! Maybe a smaller size would help with the underarm wrinkles – it’s not like you generally see bust darts in a t-shirt to deal with that. Sometimes I have to try on RTW and look at the wrinkles to make myself step away from over-fitting something.
LikeLike
I think making these tees would be worth it once you get the process down. I’ve made a few, and I thought they were perfect, and fit like RTW or better, but then I too noticed I have that excess above the armhole, so I haven’t made the adjustment yet to get rid of it. I think once I do that it will be great. But, I still can’t resist buying tees from Target. I would also like to buy better knit fabric like modal or supima cotton etc. Or make a tee like Michael Starrs, that cost like 55.00. But, I think the fit looks really good on you.
LikeLike
Three firsts, good going! Your seams look really nice and flat, your ideas on how to accomplish that obviously worked. I often get wavy wonky seams when I sew knits. So thanks for the tips and for joining in on the November Challenge!
LikeLiked by 1 person
I’m so glad I experimented with the stretch stitch. It really makes a huge difference on the seams on a knit, keeping them stetchy.
LikeLiked by 1 person
Well done! There is a rule of thumb for figuring out neckline bands on stretchy fabrics. I can’t remember if it’s 25 or 33% difference -in other words make your band that much smaller and it snugs up to your shoulders and neck nicely. And suppose it varies with each fabric too. You could start with 25% smaller and go from there.
LikeLiked by 1 person
Thank you, I was sure there some rule of thumb. I’m going to use this soon.
LikeLiked by 1 person