
My husband and I’ve were recently invited to a party to celebrate the elopement of some dear friends. The happy couple wed in Hawaii last December and then planned a Hawaiian style dinner party in Colorado for their friends. The outdoor event became a summer bash because Colorado in winter, while beautiful, really doesn’t instill that tropical feeling.
Anyway, my husband got the evite and I never actually saw it. 5 days before the party while chatting with another invited guest I found out Hawaiian attire was requested on the invitation. Oops! I don’t own any tropical wear!
Because finding a garment that fits a theme and my figure is such a stressful process, I decided to sew something instead. With no time to test an untried pattern, I sorted through my A-Z garment posts for something that could work as a casual party dress. I decided my T project, the Tie-On Dress, was my best bet. The dress was simple to execute and the fit was good – I thought the first version had turned out well. My decision made, I rushed over to Joann Fabrics and bought the only Hawaiian themed rayon they had. I felt really grateful that I know how to sew – I didn’t have to search a million stores looking for a dress!
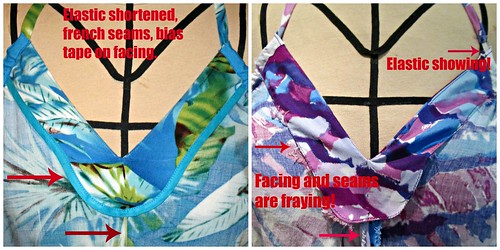
In an effort to make my Sew All 26 project a learning experience, I examined my first Tie-On dress to see how I could improve the second rendition. What I liked the least about it was how the inside was finished. I had followed the sewing instructions to a T (sorry, I couldn’t resist) but the inside looked very Becky Homecky and could definitely be improved. So I decided to “Jane” it up. Fellow DenverSews blogger Jane is known for making the insides of her dresses look as perfect as the outsides. It was time to break out the French seams!
Besides the unsightly seams, the original dress had a home sewn looking neck facing. Facings always look wonky to me, but this dress needed one. To improve the look of the neck facing on the inside, I added narrow double fold bias tape around the edge of the facing for a more professional looking finish. With the inside issues resolved, I scrutinized the outside and remembered that when I last wore the dress a little bit of elastic showed between the end of the bodice casing and the beginning of the neck straps. I increased the length of the straps and shortened the elastic by a couple of inches so none of the elastic would be revealed when the straps were tied. Just 3 small additional improvements from my first effort, but I think these changes brought this dress up a notch.

Thanks my friends! Fortunately I’ve finally arrived at a place where making a dress (that I’ve made before) IS less stressful than shopping for one that will match a certain theme. I’ll admit it was more difficult than I expected to get the dress finished in time, I think those French seams around the pocket bags definitely slowed me down a lot. I ended up arriving at the party with a machine basted hem, not the best look!
LikeLike
Kitty – the dress looks great. I’m a big fan of bias tape when I can’t use the French seam method. And I do understand how it is less stressful to make a dress in 5 days than buy one.
LikeLike
So funny that it’s less stressful to sew something 5 days before an event than to go shopping. I’m hoping I get to that place with pants!
The improvements to the inside look great, thanks for showing us your frayed seams. 🙂
LikeLike
I see improvements in the second one, looks like a cleaner finish. Love the fit. Now you’re a total trendy Hawaiian girl. And I got to see a pic of your hubby!
LikeLiked by 1 person
What fun! The dress looks great and you both look great and the improvements are much nicer!
LikeLiked by 1 person
Thanks Lynne! The party was a lot of fun and several people had compliments regarding me making the dress. And a couple of those compliments were from people I didn’t even know, so that felt really good!
LikeLiked by 1 person