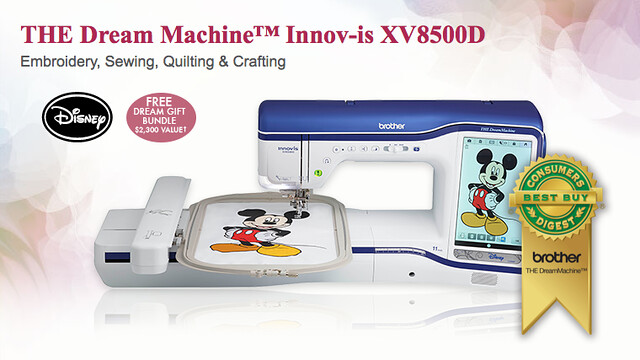
I had the chance to check out the latest top-of-the-line home sewing and embroidery machine from Brother courtesy of Rocky Mountain Sew and Vac in Littleton, Colorado. It’s called the Dream Machine and it truly makes you dream. Note: I am not associated with Brother or with Rocky Mountain Sew and Vac in any way. I am just an interested consumer of sewing and embroidery machines! EDIT: For a more recent review of My Design Center, see this blog post.
This is a rather lengthy post. If you’re seriously interested in this machine, you should go to Brother’s promotional web page (click on the top image) and watch all of their videos. It will leave you tantalized and curious about the details. This was my attempt at filling in some of those details.
Sewing
If my Brother ULT2001 is any indication, Brother makes very good sewing machines that offer a plethora of utility and decorative stitches, including alphabets. I would expect the Dream Machine to be at least as good.
The Dream Machine comes with something called a MUVIT(tm) which replaces the standard walking foot. It’s a rather large contraption placed behind the presser foot. It has a little conveyer belt that moves the top fabric along, presumably at a speed that matches the sewing speed.
There is a dual laser guide that helps you sew straight. There is a straight-down laser that shows you where the needle is going to drop. This works best when your presser foot is up, so you can look under the foot to see where your next stitch is going to start.
There is also something called a V-Sonic(tm) Pen Pal that allows you to set needle positions and stitch widths (like the width of a zig-zag). You can use it to tell the machine how far you want to stitch. When embroidering, you can use it to tell the machine which way your fabric is hooped (i.e. how much rotation to apply to your design).
Embroidery
If I had any reason to buy this machine, it would probably be for its embroidery functions. Where do I even start?
This machine comes with the biggest hoop that Brother has ever made on a home machine: 9.5″ x 14″. I rarely stitch anything bigger than 5″ x 7″. But with a larger hoop size, you could arrange smaller motifs into a larger single design and sew it out all at once without rehooping. Or you could sew multiple copies of the same design at once. You may have to buy larger widths of stabilizer for this larger hoop. It also comes with 8″x12″, 5″x7″ and 4″x4″ hoops.
If you purchase the machine (and take delivery) before October 31st, you get an 8″x8″ hoop and PE-Design NEXT. The larger square hoop is a great mid-size hoop. PE-Design NEXT is version 9 of Brother’s digitizing software. Version 10 is the latest. I have PE Design 7 and it is not my preferred digitizing software. I would hope that they’ve made significant improvements to the interface since then.
The machine has a video camera (Innoveye(r) 2) and the Snowman(r) Embroidery Positioning system. I believe both of these features are already available on newer Brother machines. I know the pain of trying to hoop items perfectly. Imagine if you could hoop close enough and let the machine figure out everything else. That’s what the Snowman system does.
The Snowman(r) positioning system got an improvement with this machine – you are no longer limited to placing the snowman in the middle of your design. I think you can now place it on the center edges or any corner of the design instead. The embroidered design can be shown on top of the fabric in the hoop for even more precise layout.
This machine sports better hoops. The largest inner hoop on my ULT2001 tends to bow inwards when I have to tighten the screws. These new hoops look to be very rigid along their lengths and they seem to have a small rubber gasket between the inner and outer hoops for more grip, perhaps. I think the screws themselves are better designed for easier turning.
The embroidery arm has been improved with something called Accutrac(tm) which is supposed to provide smoother frame movement and less bounce.
The machine tells you what color you should be sewing with next with its Innovachrome(tm) LED system. This is a light bar that sits above the thread spool and it changes colors to match the thread color you are supposed to be using. We were told that it can represent millions of different colors.
If you want to change around the colors you’re using in a design, you can use the color shuffling function. You can choose a palette of colors to shuffle from, you can let the machine choose colors randomly, or you can choose from a color family. I’m pretty bad about choosing colors, so this might be a nice feature.
Auto-Digitizing
Admittedly this is the most intriguing feature I’ve ever seen added to an embroidery machine: the ability to auto-digitize from a scanned image or a JPG imported from a flash drive.
The machine comes with a scanning “hoop” upon which you place drawings held down by magnets. They call it the ScanImation(tm) Scanning Frame. The machine can scan the image with its video camera. You crop the scanned image on the touch screen. The machine can then convert the image to an embroidery design consisting of either lines (like redwork) or filled areas.
Now if you’ve ever done your own digitizing, you realize that auto-digitizing rarely works as smoothly as you would like and that much tweaking is necessary to clean up the resulting design. You need to add underlay, use pull compensation, change stitch directions and stitch densities.
Our presenter, Rob Richards, showed us a design he auto-digitized from black and white clip art and then stitched out:
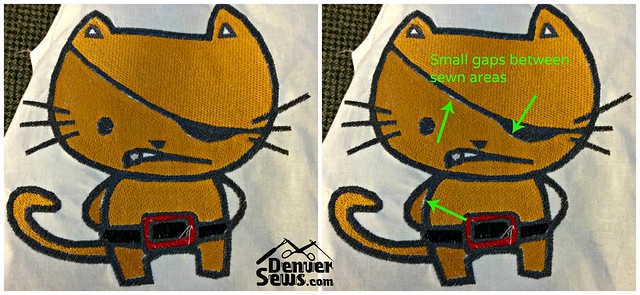
It’s not too bad! The gaps between sewn areas may be due to insufficient pull compensation. The software does give you some options that you can tweak for each sewn area. Here’s a screen shot of those options:
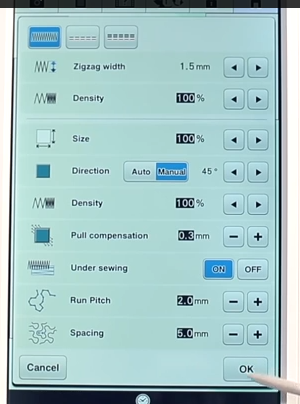
The basics all look to be there. You can change the stitch direction for fills (though you have to use arrow keys to change the angle). You can change the density (but what does “100%” really mean?) You can set the pull compensation. And you can turn on/off under sewing. With digitizing software, you have more options (different kinds of underlay, different ways to apply pull compensation, different fill patterns, etc.) and it is hopefully easier to change the stitch direction.
Another thing to note is that the dark outlines for the cat were digitized as “areas” rather than as lines. If they had been recognized by the software as lines, then the lines could have been turned into either straight stitches or a satin stitch (zig-zag), to give more of a consistent cartoony look to the final design. This is what I might have done if I manually digitized this design.
The software really has only two options: convert a scanned image to lines or to sewn areas. It may be possible to do it once for lines and then once for areas (eliminating the outlines which have been converted to areas) and then combine the two later. This would be a great experiment to perform!
For that perfect custom button hole, you might be able to take a line drawing of the button hole and convert the line into a satin stitch. If the software provides it, you might be able to add underlay to the satin stitch to provide additional stability.
So again, auto-digitizing is usually fraught with peril. It remains to be seen how robust the software is. If it works well, it could provide tremendous opportunity to auto-digitize simple logos and drawings (the cleaner the image the better). You can digitize quilting designs and writing. The possibilities are endless.
I forgot to mention that you can also digitize directly on the touch screen. It looks to be extremely basic and you’re probably better served using the auto-digitizing features from finished drawings.
I also forgot to mention that lighting is evidently quite important when scanning images. Rob had to darken his room to keep the lighting on his scanning frame uniform. Scanning with a sewing machine is not the same as scanning on your printer’s scanner bed which has a cover to keep out extraneous light.
Other Stuff
I list this last, but it may be quite significant – the touch screen is 10.1″ diagonal – bigger than my iPad! And it has a respectable 1280 x 800 pixels. The bigger size is much better for viewing your embroidery designs and seeing what the video camera is seeing.
Harp space is 11.25″ – great for quilters.
If you like Disney, Brother is the only company authorized to have Disney designs on their machines. If not, there are plenty of other designs. Of course it is easy to import designs via flash drive.
If you want to give up doing free-motion stippling, you can try the auto-stippling features of this machine. Evidently you tell it what area you need filled with stippling and the machine will auto-compute a stippling design for you. It is also implied that you can create your own stippling designs. I did not see this demonstrated so I’ll believe it when I see it.
Video tutorials and instructions are provided on the machine.
You can watch MP4 movies on your sewing machine (from a flash drive). Evidently this machine does so much for you automatically that you can just watch a movie while you’re waiting!
I’m sure I’ve forgotten other stuff…
Cost
The MSRP for this machine is a $15,000. Just like buying a new car, you can trade in an old machine to get credit towards the new one. I’ll admit I’m a sucker for new technology. I would love to push the limits on what this machine can do. But in reality, I do more sewing than machine embroidery and I can probably do a better job digitizing with my existing software. It also takes up a lot of table space and you need storage space for its accessories.
But if machine embroidery is your thing and you’re not a commercial operation, this machine is probably the most innovative thing out there right now. The hardware looks really solid. The software looks really promising. Combining a video camera, lasers, smart pens, touch screens, scanning frames, auto-digitizing software, snowman stickers and a conveyer belt all just blow my mind. If anyone of you buy this machine, I want to hear what you think of it!

Lovely design and great design
LikeLike
I purchased the Dream Machine in February. It’s a great machine which I use equally for sewing and embroidery. It has many wonderful features but also some drawbacks. While the machine does have on board tutorials, there is no sound. It was touted as a machine you could play music through, but again, the sound does not work. My local dealer claims Brother is aware of the problem and working on it. The other drawback is the cost and availability of accessories. I was interested in the 4 x 12 border hoop and was quoted a price in excess of $600, the 8 x 8 over $500. It seems a very pricey proposition. The dual feed foot is great for sewing straight lines of thick materials but occludes your view of what has been sewn for some distance. I decided to purchase an actual walking foot for the machine and it retails for about $99. The size of the machine is also a bit of a drawback. You need a lot of surface to use it and taking to the shop or to sewing class can be difficult at best. I did get the brother “luiggage” with my purchase which will allow me to store the machine and embroidery arm when not in use. I found the case for the embroidery arm an alarmingly tight fit. There is no protected storage for the hoops, the only place they fit is in the outside pocket. I plan to replace the brother bags with Tutto brand cases when I can afford it.
On the plus side…One of the reasons I bought the Dream Machine was the wonderful experience I had with my Brother SE400. An inexpensive, small combination sewing and embroidery machine that served (and still does) me beautifully. It has comparable features to more expensive sewing machines and it embroiders well in the 4 x 4 inch hoop. I researched a lot of machines before upgrading and even with its flaws, the Brother Dream Machine was right for me. It sews like, well, a dream. Quiet and powerful, it has no trouble handling anything I’ve thrown at it. I love to piece quilts and so far we’ve pieced three tops together and quilted one. The other two I plan to quilt using the embroidery hoops (Edge to Edge Quilting Book and CD). My daughter used the scanning feature to make an appliqued wall hanging. She scanned in an outline of the applique, programmed a running stitch to outline the design and then placed the cut pieces in the hoop and programmed a satin stitch to hold it down. Less than 30 minutes to scan, cut, apply and finish the design which would have taken at least an hour and a half in the traditional way and the results would have been less perfect. (Satin stitching curved pieces is a challenge for both of us.) The other embroidery designs I stitched out have come out beautifully. I don’t use pre-wound bobbins so I can’t speak to the compatibility of various brands with the machine. I also use a lubricant on my embroidery thread to minimize shredding and breakage called Sewers Aid. A little bit on my thread spool before I start seems to work wonders. It was a necessity on my SE400 when using metallic thread since I couldn’t slow down the embroidery speed. I’m concerned about thread/lint buildup in the upper part of my machine since I can’t get to it and clean it on a regular basis. I did buy a set of attachments for my vacuum cleaner at our local Harbor Freight store so that I can use my vacuum on my sewing machines but I don’t know if it will pull any lint from inside the closed case. I have seen enough buildup in my bobbin case to interfere with the thread sensor that warns me when I’m running out of bobbin thread. Regular cleaning takes care of it. Only time will speak to the durability of the Dream Machine, so ask me what I think of it in five years! I’d love to see Brother resolve the sound problem in the near future so that I can make full use of the MP4 function.
K. Waterhouse
LikeLike
I agree with you. Time will tell if this machine remains the Dream we all hope it will be! I’m glad your daughter was able to figure out how to do applique with the scanning features. You can’t really do complicated digitizing with the Dream, but you can do some interesting stuff for sure!
LikeLike
Interested in dream machine where can I buy for under 8900.00? I have a baby lock ellismio.
LikeLike
I also Love my Dream Machine. So far I’ve been sewing almost daily lol. Made Christmas stockings and lots of table runners. The store you purchase from here is awesome they supply lessons on your machine for free and not just embroidery. The light is bright and smooth sewing and I’m in dream land lol. Carol from High River Alberta Canada
LikeLike
I am after a brother embroidery only machine, i also need the software with this, PE DESIGN 7 or PE DESIGN LITE, obviously the lite is alot less expensive, i want to produce my own designs but dont want to pay for somthing i do not need, has any1 any experience of these packages, also as ive been searchin for the software ive found various sites you can download them for free, however im under the impression you need the brother card reader/writer and you can only buy this with the software? has anyone any advice! Being student i need the cheapest way possible of acheiving my embroidery dream!!
LikeLike
Stitch Artist (Embrilliance) is fairly inexpensive for digitizing. You only need a card reader/writer if your machine doesn’t read USB flash drives.
LikeLike
I have had my Dream Machine for one year and really love it. I use the embroidery part only and use it almost daily. I also have the Baby Lock Elissimo and loved it until I got my Brother Dream Machine. The satin stitch for applique it perfect.
LikeLike
Love my Dream Machine and thought that I would not be able to afford it after seeing it at the local sewing shop. My husband said get it but I could not justify spending so much at my age, 72. Well Brother then had a “no interest” program on the machine—–so now one sits in my studio! It sews like a dream, easy to use, just can’t say enough about the machine. Sew almost everyday.
LikeLike
We have had the Dream Machine since 11/14 and have 3 million stitches on it now (5/9/16). We made 70 personalized projects for relatives for Christmas. These are cherished. Most designs were on the machine or combinations of things found on the machine, such as text added to a figure. We also purchased a lot of logos found on google.com. We absolutely LOVE it and almost all our work has been embroidery. We are using PE Design 10 now (Upgraded from PE Design Next that was included) and getting pretty good at it. I have digitized a Jeep Rubicon photo, some logos, and a photo of grand daughter with her Arabian horse. We used on-line tutors from Brother which were very good. The software is quite complex and I found navigation extremely difficult at first, not knowing where to go to do something. The tutorial was invaluable.
We LOVE the machine (Did I say that?)
Shortcoming: The machine has a closed case which voids the wty to open.
Result: simple thread fouling cannot be cleared by the user. It must go to the shop for work which is covered by wty now. Right now, it is in the shop because we used recommended metalic thread which sews an outstanding pattern that REALLY stands out, but the thread is scratchy and seems to have shread some particles which fouled the machine. I am not fond of such a thing where a simple tweezer job would clear it IF I COULD GET AT IT. But, no, it is in a closed case and opening it voids the wty. Not good.
Suggestion: Brother, please put a door over the area of the upper thread.
We have to drive 60 miles to a shop to get it fixed and leave it there for 3 days to 3 weeks. Some day, that won’t be covered by warrandy.
Conclusion: We LOVE the machine. It is 5 stars. Other machines brands spend a lot of time in the shop as well.
LikeLike
So glad you love your machine! Thread shredding for me has certainly been an occasional problem and it’s very difficult to get that thread out sometimes because of the closed case. I slowed the embroidery speed down quite a bit and haven’t had a shredding problem since then. Good for you for using your machine so much and for digitizing! It’s really good to hear that the DMs are performing well so far. Lynne
LikeLike
Sorry. I should have signed my post.
Micheil-Ann in Portland, Oregon
Dream Machine
LikeLike
Hello. My friend and I both bought the Brother Dream Machines a little over a month ago. So far, mine is working just fine, except it definitely likes Brother bobbin thread, not Bottom Line which I used to use all the time in my Bernina 830 and have a ton of it. I have embroidered the Nursery Rhyme designs from Anita Goodesign for a baby quilt and they came out very well. There are really no classes in our area to learn how to use this machine, but it does seem very easy to figure out. My friend has had her machine in the shop close to a month now. The top tension assembly has to be replaced. We are very unhappy with the dealer service because they seem to be “putting off” my friend now when she’s inquiring about her machine. She used the machine a total of two weeks to the day she got it. I loved your tutorial and have printed it out for future reference. Thank you so much!
LikeLike
Are you still happy with your Dream Machine?
LikeLike
Wow I am sure slow to notice new comments! So sorry. You asked if I’m still happy with the Dream Machine and my answer is yes. However, I really only use it for machine embroidery so I can’t tell you how well it sews. My only issue with the machine so far is that it tends to shred some of my threads when I’m running it at top speed. I’ve found that if I slow the machine down, the shredding stops. But I didn’t buy the machine to embroider slowly! I will say that the scanning functionality (My Design Creator) is very handy for some things and having a video camera makes positioning very easy. My Brother ULT 2001 was extremely reliable and never shredded threads, but it didn’t have a camera. Is the DM worth the money I payed for it? Time will tell.
LikeLike
I still love my Dream Machine too. It sews so quietly. After a month, the store gave my friend a new machine and now she is very happy. We both especially love the walking foot for sewing the binding on our quilts.
Micheil-Ann
LikeLike
Before purchasing your Dream Machine you should definitely shop around for the best dealer and compare their follow-up service. In Australia the best retailer is definitely Echidna Sewing and Embroidery. Help is never more than a phone call away and I have never had to wait for more than 1 week for service/ repairs.
LikeLike
Man! That machine is a “Dream.” I would love to be able to learn digitizing. But it’s too many 00 in that price. I asked about Baby lock digitizing software, $2000.00 and they said it required going to school to master it. So, I gave up the thought of buying the SW.
Let me know when you buy it! 😉
LikeLike
I have had my babylock for thirteen years and use palette and did not go to school and its easy to use and a lot of fun. I have designed a lot of custom baby quilts and it never gets old. Recently my machine went down and the dollars to fix it scares me so I am going to purchase the se400 brothers sewing/embroidery for under three hundred and the palette software will work for it as it reads pes which is what my babylock also uses and both made by brothers.
LikeLike
I started with a PE700 and found it to be very easy to use and reliable. I hope the SE400 works out nicely for you. These little embroidery machines are great and can really get the job done. Lynne
LikeLike
Ooh, Lynne, this machine sounds totally awesome! Thanks for your info on it. I love Brother machines but I’m afraid this one is beyond my budget and my limited understanding of technology. I’m still working on how to use my cell phone…
LikeLiked by 1 person