I spent one week in Seattle, Washington with my teenage son who is attending the DigiPen Pre-College program. During that week, I hung out with my friend Paula. We met on the textile tour to Japan in March and have been buds ever since. She is an amazing seamstress! Besides doing touristy things, we compared sewing notes and visited many of the local sewing establishments.
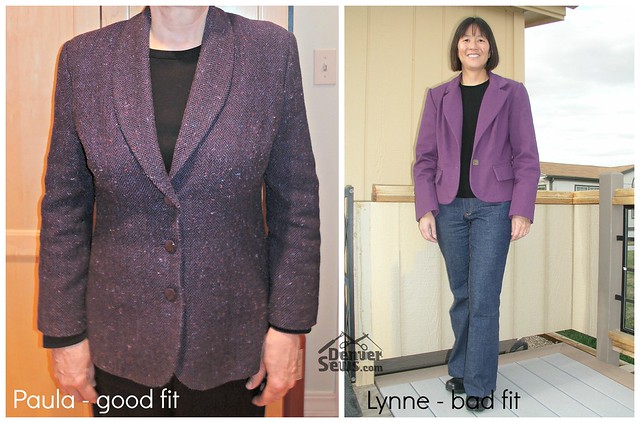
Good Fit I suspect that for most of you, you already know how important fit is. I, however, have had my blinders on since day one in my rush to complete projects as quickly as possible. Yes, I can do a small bust adjustment, but that’s about it. Paula, on the other hand, has constructed the most amazing collection of fitted jackets I have ever seen.
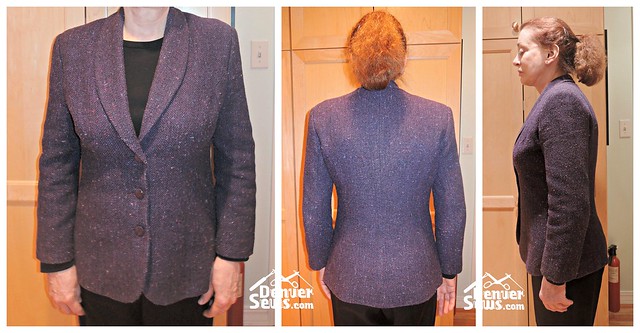
Bad Fit I have made only one fitted jacket and I made it in 2009 or 2010. I made it without knowing anything about fit, proper fabric selection, or proper construction techniques. In my naivete, I even entered it into a PatternReview contest! What was I thinking? I still have that jacket and here it is.

The sleeve insertions are truly horrendous.
Looking Forward I tried on Paula’s purple jacket and it was a pretty close fit for me, needing only a few adjustments in the princess seam, shoulders, and hip width. I was surprised how comfortable it was. I can see myself wearing something similar for work and for casual occasions. It’s just that comfortable.
Paula did this amazing thing for me and traced her own pattern, making the small adjustments she thought I needed. I now have that pattern. And I have a couple tailoring books I checked out from the library. I am now in the process of acquiring the things I need to really do a good job: a decent steam iron, a ham holder, a seam roll, a clapper, a tailoring board thing, some silk thread etc. I also purchased some fabric from Fabric Mart, an interesting looking eggplant and black tweed boucle in 100% polyester. Polyester may not be the best fabric for learning how to ease in sleeve caps, but it was fairly inexpensive and appealing to my eye.
I will still need to acquire lining and interfacing, but I’ll leave that to a later time when I have the fabric in hand and have a plan. I will likely make a muslin first as well.
Attention to Details In the meantime, I am now paying more attention to my buttonholes. Normally I just let my machine do whatever it wants to do and I hack through the buttonhole, leaving cut threads poking out all over the place. It’s really atrocious, in retrospect. Now I try and cut my buttonholes cleanly and if the machine doesn’t do a good job sewing them, I’ll take out the stitches and try again. And as for the ends of threads, I used to just snip them and let them unravel at a later date. Now I take the tail, bring it to the back, hide it, and tie it off. Much better.
I know I am behind the curve here, but I am very excited to start sewing to a higher standard. I apologize to all of you who have known about this all along and have likely been appalled by my carelessness. I have been blind, but now I see!
A Side Note Paula is looking for a machine embroidery pattern of a keyhole buttonhole with sufficient distance between the legs so as to allow a nice clean cut between them. If you have ever seen such a thing, let me know!

Hey Lynne,
Ok a few thoughts: on buttonholes: if you use a stabilizer while sewing them, and also a bit of fray check BEFORE cutting, in addition to using a chisel instead of a seam ripper, you will be well on your way to perfect amazing buttonholes.
Sleeve cap ease is crap. Seriously, if you are constructing anything that does NOT have puff sleeves or is a casual wear item, take out the sleeve cap ease. Here’s a bit on that for reference: http://www.fashion-incubator.com/archive/sleeve_cap_ease_is_bogus/
Third, you can go to home depot or lowes and get a nice PVC collar that fits your ham for a LOT less than they sell the ham holders, and it works pretty darn good. Just take your ham with you for fitting.
Good luck and Happy Sewing! Hope to see you at Sew N Sudz again soon!
LikeLike
Lynne, I applaud you for tackling a tailored blazer, what a difficult project! Expert sewing is such a long journey, but you are on your way to perfection.
LikeLike
Thanks for the vulnerability. We all have projects we just pushed through to finish, not to finish well! Keep us posted on your progress.
LikeLike
I applaud your efforts of today. It’s never too late to perfect your techniques.
There is a button hole cutter in Nancy Notions catalog. It takes all the worry out of opening your sewn button holes. You might find that fusible hair canvas is best for aide in shaping the jacket lapel and the jacket front. If I can be of any assistance please call me. You’ll do good, because you are good at all the other sewing projects when you put your mind to it. Happy Tailoring!
LikeLike
I recently made several button front skirts with the button holes going through several layers and hated how messy the buttons holes looked. What worked for me was to cut them with a sharp xacto knife. I understand blazing through a project to get it done, I to am learning to slow down and I’m enjoying the rewards.
LikeLike
On my machine, I can manipulate the distance between the legs of an embroidered buttonhole. Ask at the shop where you bought your machine. You may be able to do the same.
LikeLike
What machine do you have, Lori?
LikeLike
I have a Pfaff 2144 and a Pfaff Creative Vision. But I bet the buttonholes can be modified on other brands as well.
LikeLike