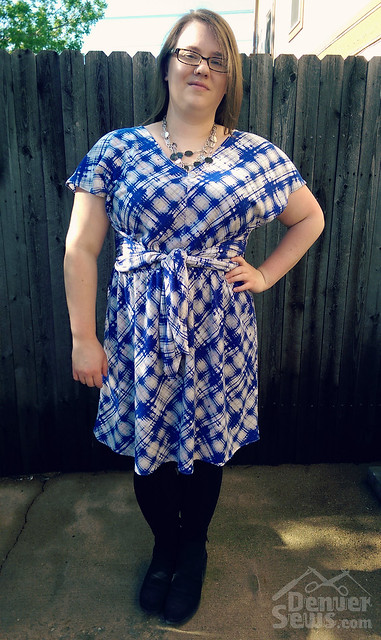
After a few busy weeks where I didn’t have time to sew, the thought of going back to the the moto jacket I was working on was starting to feel like a chore. Do you ever spend so long on a project it starts to weigh on you? I’m still going to finish it, I SWEAR, I just felt that at the moment I needed an easy win to get my confidence back up. Enter Vogue 1395 – a Rebecca Taylor dress pattern from the latest spring Vogue collection.

The pattern called for lightweight wovens like silk crepe de chine, but I had a jersey with a sketchy plaid pattern from Hancock’s that I liked for this design. Somehow I’ve gotten into a habit this year of using knits for woven patterns and I’m not sure why… I think I have a lot of knits I like and most knit patterns are so boring that I skip them over and start looking at the woven patterns.
I started off by setting up my serger and threading it for a combination chainstitch plus 3-thread overlock. I practiced on a strip of my fabric, but the overlock stitch looked horrible with huge loops on the backside of the needle thread. No problem, my manual told me exactly which tension to adjust for this problem… except raising the tension as high as it would go for that thread had zero effect on the stitch. Two hours later I had messed around with about every tension combination but no matter what I did the stitch looked exactly the same! (Side note… I’ve wondered with the newer sergers with auto-tension and no user tension adjustments what you would do if the stitch didn’t look right… but I guess my ability to change the tension didn’t help anyways.) After this I was feeling pretty upset which was the opposite of my plan to stick with an easy project. Duh! I had lost sight of the mission completely. So I put the serger to the side, got out my regular machine, and got busy.
Here’s a sampling of the shortcuts I took on this project in the name of just having fun…
- I cut the tissue paper instead of tracing off my size. (I know, I’m weird for usually doing this.)
- I didn’t make a muslin.
- I didn’t iron the tissue paper.
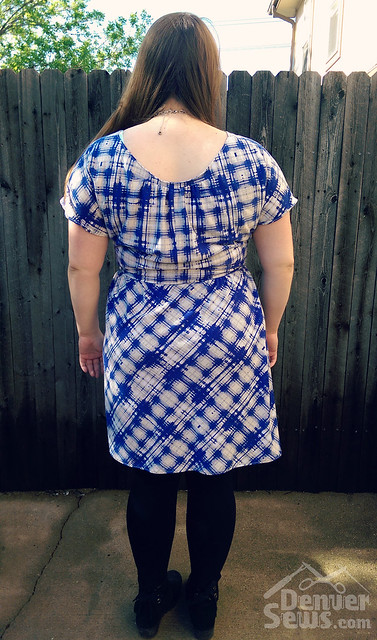
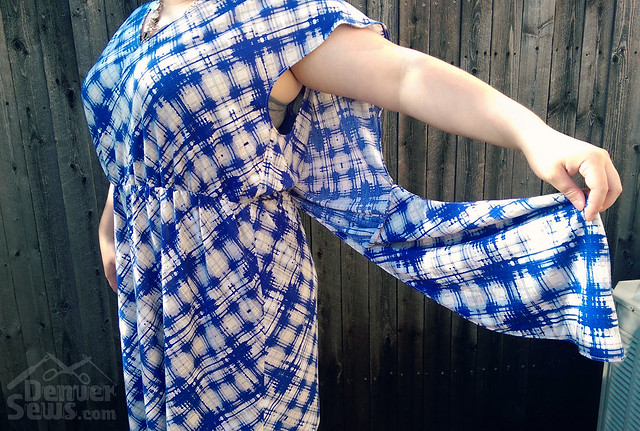
- I cut my pieces on the bias instead of the straight grain because I liked the print better that way. (By the way, somehow I managed to use a quarter yard less than the listed fabric requirement with my bias layout – crazy!)
- I didn’t match my plaid.
- I didn’t cut out the facings and just flipped and stitched around the neckline and armholes instead.
- I did zero fitting along the way… just sewed it up.
I know, I’m so sloppy! But nobody was harmed in the process and something wearable came out.
I did make a few changes to the pattern, so perhaps I tried harder than I’m admitting. One was to raise the neckline by 1″. My instinct was that it looked too deep when I held the tissue paper up, even though it doesn’t look that deep in the envelope picture. I’m glad I trusted my instinct because otherwise it would have been too low.
I also lined the ties with a piece of self fabric since the wrong side shows. This was as easy as cutting another tie, sewing the two together and flipping inside out. The pattern had you hem the tie, so I topstitched along it to make it look the same. Finally, I did french seam at the waist instead for the elastic casing to keep the inside looking prettier.
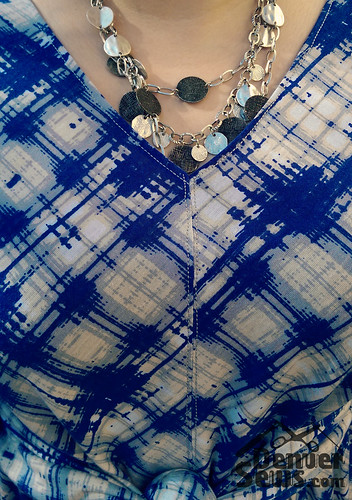
For all of the seams and the topstitching I used a stretch stitch on my machine that I’ve never used before. I’m not sure what to call it, but it was labelled like this: “|||”. On the top side it looks like double/triple topstitching, and on the back it looks a little like a chainstitch that a serger would make. Surprisingly this stitch seems to have more stretch than a zig zag stitch, and it feels a lot less likely to break. I also like how the topstitching the pattern called for turned out. Would you believe all of this topstitching stretches about 25%?
Oh, one more tidbit I almost forgot about. When I prewashed my fabric it came out with HORRIBLE static cling. Also this ended up being the kind of knit that rolls like crazy along the edges after you cut it. But with the static cling when I’d put two edges together they’d cling to each other instead of rolling back up, so well in fact that I didn’t have to use many pins. Hooray for serendipitous coincidences!
Anyhow, my confidence is restored and there is a jacket lying in a forgotten corner that is calling to me now.

Did you just measure add the inch to the top of the neckline?
I have been looking at this pattern since it came in an email- now I need to give it a try!
LikeLike
Yup! The neckline is a bit curved, so I traced it onto another piece of paper and measured an inch up, then angled the original neckline between this point and the shoulder to draw a new line. Here’s a pic to help: https://www.flickr.com/photos/51676761@N05/14295450755
LikeLike
Great job on fabric piecing. It looks so nice. I am surprised the stitching stretches so. Looks like a gauzy fabric, not knit!
LikeLike
Wow Jamie, you look absolutely gorgeous! Question: did you make your usual size or size down since you used a knit? You’ve convinced me – I MUST buy this pattern!
LikeLike
I just cut my usual size. My rule of thumb is that if it is loose fitting, I cut my normal size even in a knit. If it is form fitting (like a sheath dress), go down a size for a knit.
LikeLike
I can totally relate to the feeling of needing a quick win to restore my enthusiasm for sewing. I love the plaid on the diagonal; it’s much more interesting and flattering than it would have been on the straight grain. I never trace multi-size patterns onto other paper–I’m never going to use any size but my own. I’ve had that same experience of the neckline looking fine in the picture but being way too low on me–good job anticipating and solving a potential problem before cutting.
LikeLike
Jamie – I LOVE it! It is my favorite thing you’ve made so far. You look fabulous. I am so *shocked* you didn’t trace the pattern. You’re such a rebel.
LikeLike