This jacket is from Islander Sewing Systems and it’s my  “I” project. The pattern is Jacket Express #218 and it was designed by Janet Pray. There’s also a great craftsy class on the construction of this jacket called “Sew Better, Sew Faster: Garment Industry Secrets with Janet Pray”. You can order the jacket pattern here for $22.95 plus shipping, but if you wait for a craftsy class sale you might be able to get the deal I got: the pattern (including shipping) and the craftsy class for only $19.99. A super deal IMO!
True to its title, “Sew Better, Sew Faster” really did teach me to sew better and faster. I learned so many innovative techniques in this class! One great tip was how to sew without pins, another was how to transfer pattern markings with a special erasable office store pen. Because I tend to pin things to death and do all my marking with tailor’s tacks, these 2 new tricks really sped up my sewing. And Janet Pray’s interfacing instructions eliminated the “orange peel” effect I usually get when I use fusible interfacing. There were so many efficient sewing methods detailed in this class I couldn’t possibly list them all here. Of all the craftsy classes I’ve purchased this one has definitely been the best!
Since adding the craftsy class was an unusual sewing expense for me I assumed the total cost for this jacket would be sky high. So I kept track of what I spent, and most of the costs were easy to tally. The pattern and craftsy class cost $19.99. The fabric was a thrift store find for only 49 cents. The sewing thread and top stitching thread cost $4.34, the interfacing was $1.23. The buttons were $3.36. But what about the cost of the extra fabric I bought because the thrift store fabric didn’t have quite enough yardage? And should I count the third fabric I bought because I ended up not liking the color of the first extra piece?
Well, I didn’t use either of the 2 additional fabrics I bought to make the jacket. I was able to fit the XS (which fit great with no alterations, by the way) on less yardage than the instructions called for. But since I bought the 2 extra fabrics for the jacket should I include those purchases? Or because I didn’t use the fabrics should they not count? I decided not to add them to my total since I earmarked both materials for other projects. So that brought the jacket cost to $29.41. Considering the priceless new sewing methods I learned from Janet’s class, this jacket was an incredible bargain! I love that!
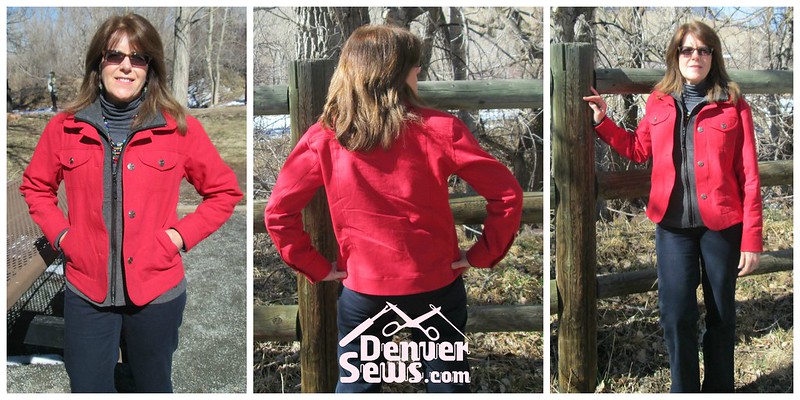
But please don’t get me started on the total in hours I spent making this jacket. It was so many I lost count – it literally took weeks, not hours! This jacket has 19 pattern pieces and the final tally of construction pieces was 40! Yikes! No wonder I’ve never made a jacket before. I have a new-found respect for all seamsters who sew jackets and coats. I had no idea jackets had soooo many pieces! Thank goodness this is an unlined jacket, or I’d still be sewing it in 2015.
Although it took what seemed like forever to sew this jacket, I’m really happy with how it turned out. Janet Pray’s tips on topstitching made this jacket look more RTW than anything I’ve ever sewn. And who’d a thunk I’d be capable of welt pockets and buttonholes (albeit imperfect ones – I definitely need more practice on both). Thank you Janet Pray! Your craftsy class really kicked my sewing up a notch!

Thank you for your review 🙂 It’s helpful for me, deciding is this Craftsy course the right for me.
Nice jacket, well done. I’ve never sewn one, and it seems a pretty big project.
LikeLike
Kitty, any chance you’re going to Longmont the 26th? And if so want to bring this? I signed up for that class on a sale a long time ago and have the pattern, maybe seeing the finished product might inspire me to start 🙂 If you learned a lot, I’ll be like a doe in headlights.
LikeLike
What an awesome looking jacket, Kitty! Hope to see it in person some day!
LikeLike
You did an amazing job. Again. I need to take classes.
LikeLike
What a great find on the fabric! This jacket really looks RTW.
LikeLike
First of all I love your name – I used to live in Phoenix, Arizona. And RTW – IMO the ultimate compliment. Thank you!
LikeLike
Thanks! 🙂
LikeLike
Your jacket looks good. I can’t see the top stitching but I know it’s good. Craftsy is a good place to get tips and ideas. Your next jacket should be a lined blazer! You’re ready now to handle it.
LikeLike
Thanks for the vote of confidence Sylvia. I do wish the jacket was lined. The inside looks unfinished.
LikeLike
I know I said this already when I saw it in person, but this jacket looks SO professional! I hope I can get my top-stitching to look half as good as yours.
LikeLike
Thanks Jamie! Janet Pray’s advice was to topstitch a needles width away from the edge to get a RTW look. I don’t think I actually got that close though.
LikeLike
Thanks Jane! Actually the fusible interfacing thing is really simple but it does work. After fusing the interfacing don’t move the interfaced piece at all until it’s completely cooled.
LikeLike
Kitty – the jacket looks great! You should bring it to the next meetup. Also, maybe you could teach me the trick of not getting the “orange peel” dimples when using fusible interfacing.
LikeLike