I recently made two bags, both of which I like very much. One is the Two Zip Hipster from Erin Erickson (Dog Under My Desk) and the other is the eClutch iPad pouch from Schoolhouse Patterns.
Two Zip Hipster
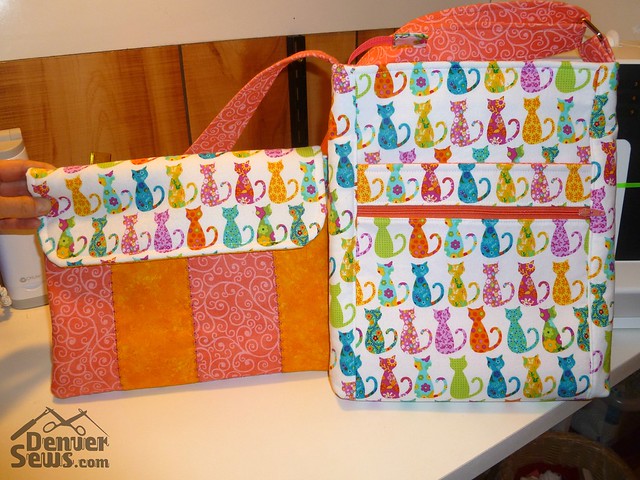
I chose to make this hipster because of its looks and its size. Though narrow (1.5″ depth), its finished dimensions are 11″ high by 9″ wide. I really like that it has a top zipper closure and two pockets on the front, one with a zipper. The design of the front pockets is such that they do not extend from side to side but are inset somewhat from the sides. I think it looks great overall.
It is my intention to use this hipster as my primary bag on an upcoming trip. For the trip, I would like to carry around my printed itinerary and my iPad. I know I can fit my iPad in the interior of this bag, but I needed to add a flat pocket on the back to accommodate the itinerary. This was easily accomplished by duplicating the bag back piece and shortening it by a couple inches.
I love this pattern and the instructions. The instructions contain all of the pattern pieces. You print them, cut them out, and tape them together. Each are labeled with a unique letter which helps with identifying them later. I really prefer having paper pattern pieces even for plain ‘ole rectangles. It is just easier to cut out the right size using a pattern piece than it is to try and manipulate and measure large pieces of fabric on a cutting mat.
I was a little confused about the interfacing requirements for the pattern so I resorted to my tried and true approach: Pellon Thermolan Plus Fusible (TP971F) for major exterior bag pieces and Pellon Featherweight (911FF) for everything else. The Thermolan Plus was applied to the Outside Back, Outside Front Middle and Outside Front Sides pieces.
The instructions are really well written and were easy to follow. My only deviations were for the interfacing and the addition of a back flat pocket.
I did manage to twist my lining pieces before stitching them together and my top closure zipper was fine on one side and totally twisted on the other. Did you know that you can fix this? I was amazed. My husband suggested opening the zipper, cutting one side, untwisting the zipper, and then reinserting the cut end back into the zipper slider body. I was skeptical, but it zipped right up! Thankfully this pattern calls for trimming the zipper and adding a little tab over the trimmed ends. So it didn’t matter that I had cut the zipper.

With that fixed, the final product looks amazing and the itinerary fits perfectly in the back pocket. I’m thrilled!

iPad eClutch
My son received an iPad Mini as a gift. I wasn’t sure what sort of sleeve or cover he might want for it so I waited to see what he thought. He thought a sleeve would be perfect. Given I had only one evening to make him a sleeve, I resorted to buying a pattern rather than trying to design something myself from scratch. I’ve done this before and it doesn’t always work out well, especially under time pressure!
I found this really nice pattern on etsy from Schoolhouse Patterns, the eClutch pattern. It calls for making a cute pieced / striped front pocket to hold your charging cables and other doo-dads. For my son, I whipped up the smaller sleeve for the mini, skipping the piecing and using a single piece of fabric instead. It looks great in black with a geometric grey/purple fabric for the front pocket.

The instructions are well written and easy to follow. It’s not a terribly complicated pattern, but the sizing was all figured out ahead of time for me so that was a great benefit. After having made the Two-Zip Hipster, I realize now that I wish I could have had paper pattern pieces instead of resorting to awkward measuring and cutting on a mat. Paper pieces are provided for the flap, but not for the plain ‘ole rectangles.
So I thought I would give it another try and make the bigger sleeve. This time I made my own paper patterns, especially for the bigger rectangles. I also chose more girlie fabrics and went ahead and made the stripey pieced front pocket. Knowing that the front flap would stick up like ears on the sides, I used two pieces of velcro on the sides of the flap instead of the one centered piece as suggested. It also looks great!

I prefer that the iPad be a little more snug in the sleeve so that it won’t fall out too easily. Next time, I’ll remove 1/2″ – 3/4″ in width to the pattern for a tighter fit.

I also used my Brother ScanNCut to create a cat applique for the front pocket. For more information about how I did it, click here.

Conclusion
Both patterns are awesome! I found that they were well written, well illustrated, and easy to follow. The final products are practical and elegant. I highly recommend both.

Thanks so much for the review! I just found you through Pinterest.
LikeLike
Great! Now, I’m off to check out School House Patterns! Thanks, Cindy
LikeLike
I really like the cross-stitch fabric for your sons sleeve: it looks like “The Matrix”!
LikeLike
Your bags are always so nice! Someday I’ll try to make another bag. These bags are so neatly made.
LikeLike
Those are cute! Have you ever worked with leather?
LikeLike
Really cute. I’ve seen the two zip hipster pattern and wondered how it would turn out. Looks super cut. And Lynne, please bring me a piece of fabric from Japan. I can pay you back. That would be even more super amazing.
LikeLike